Mexican Street Corn Salad
~ This Mexican Street Corn Salad has so many layers of flavor! It’s our twist on traditional Mexican elote – a uniquely delicious side dish that’s perfect for picnics and cookouts (especially since it can be mostly made ahead)! And after extensive testing, we’ve found a couple handy tricks for keeping it lighter, too! ~
This Recipe Is: • Ready in 30 Minutes or Less • Includes Make-Ahead Steps • Vegetarian • Gluten Free •

Have you ever spent an idyllic afternoon, wandering through the market stalls in a little Mexican town, sampling authentic street foods? Maybe some fresh, handmade tamales. Or a foil-wrapped ear of piping hot, smoky grilled elote (Mexican Street Corn)?
No?
Neither have I. But I can kind of picture it. Almost smell it. One day maybe …
In the meantime, though, I can fuel my foodie-travel daydreams (and yours, too!) with this fabulous Mexican Street Corn Salad. It’s a perfect summer side dish, bursting with:
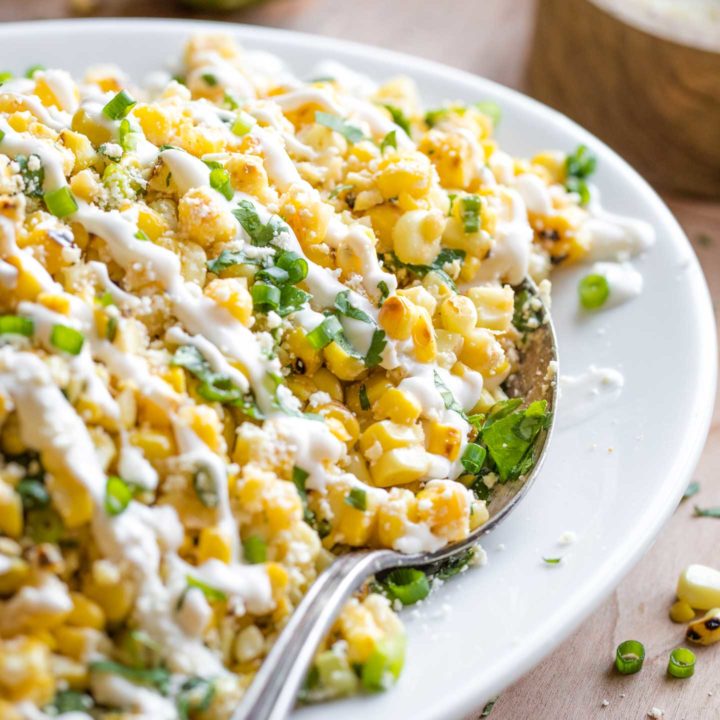
- Sweet, caramelized kernels of grilled corn
- Tossed with the zippy tang of lime juice and a little hit of chipotle chile pepper
- Then drizzled with a creamy, cooling mayo-sour cream dressing
- And sprinkled with some salty Mexican cotija cheese
So many layers of flavor in every single bite. Your own little Mexican street fair, right on your plate.
But let’s back up just a tiny bit, because there’s a lot of background to this delicious Mexican Corn Salad. And since I’ve never actually ambled through a maze of Mexican street food vendors, I tried to learn about it vicariously (aka … I googled it …), and I thought you might be interested, too.
What Is Mexican Street Corn?
Mexican Street Corn (elote), is sold by outdoor food vendors called eloteros, throughout Mexico. You may sometimes see it called Elote Loco (Crazy Corn) or Elotes Mexicanos. There are practically endless variations. Mexican Street Corn can be boiled, but it’s often roasted or grilled. And it can be slathered in mayonnaise or crema/sour cream – or both. Most recipes include lime juice and chile powder, plus a cheese (typically queso fresco or cotija), and sometimes a sprinkling of cilantro.

From there, the variations I’ve seen include substituting parmesan cheese or ricotta salata if you can’t find cotija, adding ketchup and mustard to the slather of mayo (pretty Americanized, huh?!?), and also adding garlic or hot sauce or other spices like cayenne, cumin and paprika.
Everybody seems to have their own spin on this delicious and widely popular food.
Ok, then … let’s go one step further to …
What Is Mexican Street Corn Salad?
Mexican Street Corn Salad is simply an easier-to-eat, less messy version of the beloved Mexican Street Corn sold by eloteros in markets and street-side stands throughout Mexico.
Yep! With all the variations out there on traditional Mexican Street Corn, my variation is to turn it into an easier-to-eat (and healthier) salad!
Because I’m not strolling through a charming Mexican town square with a portable ear of roasted corn in my hand. Nope – I’m serving this to friends and family, usually gathered around a backyard patio table. And not everybody is super excited about gnawing through a messy ear of slathered-up sweet corn, with crema on their cheeks and bits of corn between their teeth.

This re-creation’s got all those wonderful flavors of Mexican Street Corn … without so much mess!
So let’s talk about the ingredients I chose to use in my version, and the terrific little tips I found along the way to make this recipe healthier, too!
Pro Tip #1: How to Make Mayonnaise and Sour Cream … ahem … Healthier
Mayonnaise and Mexican crema (similar to sour cream but a little thinner) are hallmarks of the Street Corn experience. Slathered thickly all over. Mmmmmmmm …
But yeah … you know what else is slathered thickly along with them?
Uh-huh.
Unwanted fat and loads of calories.
Harrumph. How could I make that whole slathery-situation THK-healthy?
For starters, I simply use reduced-fat sour cream, which has skim milk in its formulation to reduce fat by about 50% and calories by 1/3, compared with regular, full-fat sour cream. That was an easy swap.
But my testers absolutely loved the addition of mayonnaise, along with the sour cream. So much yummier to use them both together, instead of using just one of these ingredients, as some Street Corn recipes do.

What could I do about that mayo?
My first compulsion was to sub in nonfat Greek yogurt. That’s worked like a charm in other recipes, like our Easy 7-Layer Chicken Taco Salad and our Healthy Chicken Salad with Grapes. But it just wasn’t doin’ it for me here. It completely lost the whole spirit of Mexican Street Corn. Not what I wanted at all.
Luckily, store-bought mayo has come a long way in the last few years, since my early days of blogging.
Back then, mayo still had a seriously “bad boy” rep. I tried to sub Greek yogurt into everything so I could avoid mayo like the plague.
But, new mayo formulations are lighter and use healthier fats like olive oil. Now I feel ok using a bit here and there – especially in recipes like this one, where Greek yogurt just ain’t gonna cut it.
* Pro Tip! *
Ok, here’s where it really gets interesting.
Here’s that sneaky little tip you’ve been waiting for! The trick that makes this salad absolutely THK-worthy! It’s a handy hack that helped us keep our version of Mexican Corn Salad significantly lighter and lower in calories.
During recipe testing, we quickly realized that we’d need a lot of mayo-sour cream dressing for this salad if we wanted to stir the dressing all throughout. Unless we were willing to use a lot of dressing, it really got lost when we mixed it into the salad. Way too many calories and too much unnecessary fat.
That was a problem.
The solution?
We found it was much better to present the salad on a wide, low platter, and then drizzle the creamy dressing over the top of the salad, rather than mixing it in. We could get away with using much, much less dressing – but it still tasted terrific and didn’t feel like we’d skimped. And, that strategy helped us keep the salad lighter in terms of both fat and calories.

Plus, drizzling the dressing on top of our salad sort of mirrors the authentic experience of slathering the creamy dressing on top of an ear of Street Corn.
In addition, there was an added, unexpected bonus: the chipotle-lime flavors we do mix into the corn aren’t muddied by the drizzled, creamy dressing on top. When we tried mixing it all together, those individual flavors got lost in each other and didn’t shine through as distinctly … or as deliciously.
Instead, our drizzle strategy allows the chipotle-lime flavors stay bright and clear. And the mayo-sour cream drizzle is perfectly showcased, too – creamy and cooling without adding loads of extra calories.
How to Drizzle That Dressing on Top
No need to break out fancy equipment here!
Option 1 (Quickest)
A quick way to get that drizzle action going is simply to spoon drizzle-y patterns over your salad, straight off a spoon.
Option 2 (Prettiest)
Or, to get really picturesque drizzle-lines (like we did in our photos), pour your mayo-sour cream sauce into a zippered sandwich bag. Then, nip off one corner of the baggie with scissors, and unleash your inner impressionist artist as you spatter and splash zig-zaggedy lines of drizzle deliciously across your salad! Fun, pretty and so easy!

Note, though, as I mentioned before, that this drizzling strategy works best if you serve the salad in a broad, low bowl or on a shallow serving platter. That way, the salad isn’t piled too deeply, and people can scoop up some of the dressing in each spoonful.
Also, I definitely recommend waiting to drizzle the sour cream / mayo mixture onto your salad right before serving. It thickens up once it’s been refrigerated. Still good, but just not really the perfect consistency you’ll have if you wait to add it to the salad right before you serve it.
Pro Tip #2: Cotija Cheese
Cotija cheese is pretty common in larger supermarkets here in America these days, and if you possibly can find it, I highly, highly recommend it.
We did test this Corn Salad (more than once) with queso fresco, instead, which would be another traditional option. But, without a doubt, my testers preferred the salty hit of flavor that cotija cheese offers, which milder queso fresco just doesn’t add.
* Pro Tip! *
As with the mayo-sour cream drizzle, we wanted to be sure the cotija cheese really shines through, without having to use huge amounts of it, since it’s another higher-fat and higher-calorie ingredient.

Through our testing, we found that the secret to making a little cotija go a looooooong way was all in when you add it to the salad.
Here’s what we learned:
- Although most of the steps in this Mexican Corn Salad recipe can be completed ahead of time – even the day ahead – the cheese (and all its wonderful salty flavors) are most prominent if you wait until just before serving to stir it in.
- Alternately, instead of stirring the cheese in, you can opt to sprinkle the cheese on top of your Corn Salad in a snowy layer, before drizzling the whole thing with your mayo-sour cream sauce. While this really allows the cheese to be super-prominent, though, it isn’t quite as pretty, since the cheese tends to bury the vibrant yellows and greens of the salad hidden below it.
- Lastly, you can combine #1 and #2 above (which is what I normally do – and what you’ll see in my photos). You can mix most of the cotija into your salad just before serving, but reserve a tiny bit of it to sprinkle on top. That way, you win in terms of both flavor … and visual appeal. (And we all like winning, don’t we?!? 😉 )
How to Grill Corn on the Cob
It’s easy to grill corn right on your backyard grill!
You can do a deep-dive on this in our article “How to Cook Corn on the Cob on the Grill,” but the short story is:
Simply husk the corn and remove any stray corn silk. Then, lay the husked ears directly on your pre-heated grill grates and grill them over medium to medium-high heat for about 5-10 minutes, turning them occasionally so they develop some toasty, caramelized brown spots all over. Easy!

Exactly how long you choose to grill your corn is a matter of personal preference, depending on how roasty-toasty you want it to be (and how fiercely powerful your grill is).
In most of our grilled corn recipes (like this Mexican Street Corn Salad and our 4-ingredient Chile-Lime Grilled Corn Salad), we prefer to remove the husks so that we do get those gorgeous browned spots. But it’s worth mentioning that there’s an alternate technique you can try – grilling the ears with the husks still on. You can go that route for this salad recipe, if you prefer, but you’ll be sacrificing the characteristic grill marks that you get if you husk the corn first.
But hey, you’ve got options!
And speaking of options, what if the sky opens up just before dinner, drenching your perfect Corn Salad dreams with an unexpected rainstorm? Doesn’t sound so fun to fire up the grill, huh?
Not to worry.
Although we love this recipe best with caramelized, grilled corn, remember that authentic Mexican Street Corn (made by eloteros in Mexico) is sometimes roasted or boiled, instead of being grilled. So, in a pinch, feel free to cook your corn however you choose, whether that’s on an outdoor grill, or via some tamer (rain-free!) method indoors.
Oh – and what about using raw, completely uncooked corn in this recipe (like we do in our beloved No-Cook Fresh Corn, Tomato and Avocado Salad?). Nah. I’d vote no. Not that it won’t taste yummy, but somehow that misses the whole point of Street Corn, ya know?
How to Cut Corn Off the Cob
Regardless of what cooking method you choose, let your cooked corn cool down, at least until it’s comfortable to handle.

Then, either:
- Stand an ear up on its flatter, more stable end where it broke away from the plant (rather than on its less-stable, pointy end). Hold the ear of corn at the top, above where you’re placing your knife to begin cutting, so your hand is never in the path of the knife. Using a sharp knife (this is my favorite), cut away from yourself, down toward your work surface.
- Or, use a “corn stripper” like the one in our photo.
Work your way all around the cob, cutting one strip at a time.
We honestly use both methods and find they work equally well, although the corn stripper is definitely a little less messy. But really, either is a great option!
Serving Ideas
1) This Mexican Corn Salad is obviously great as a side dish with Mexican-themed entrees, like our:
- SUPER popular 3-Ingredient Crock-Pot Chicken Tacos
- Sheet Pan Shrimp Fajitas (recipe coming soon!)
2) It’s also an attention-grabber to share at potlucks (yes, you’ll be a superstar and win loads of compliments!). Psssst … this recipe easily doubles (or triples) for large gatherings.
3) And, it’s terrific for backyard family cookouts. If you’ve got the grill fired up, anyway, try it alongside our:

No matter how you serve it, when you take your first bite of this salad, close your eyes for just a moment …
… and picture that winding street through a little Mexican market. The sun-drenched afternoon, filled with the smells of warm, grilled corn and the friendly calls of eloteros, beckoning you to come closer for a taste of their Street Corn.
Aaaahhhhh … you’re practically there. 🙂
Mexican Street Corn Salad
This Mexican Street Corn Salad has fantastic layers of flavor and texture! A delicious twist on elote. Really easy to make and can be mostly made ahead!
• Ready in 30 Minutes or Less • Includes Make-Ahead Steps • Vegetarian • Gluten Free •
Ingredients
- 5-7 ears of sweet corn, husks removed (the exact number of ears you'll need depends on how big they are – you need them to yield 4 cups of corn kernels)
- 1/4 cup chopped cilantro
- 3 tablespoons thinly sliced green onions
- 2 tablespoons lime juice
- 3/4 teaspoon kosher salt
- 1/2 teaspoon chipotle chile pepper powder
- 1/2 cup cotija cheese, divided
- 1 1/2 tablespoons healthier mayonnaise (such as an olive-oil-based, reduced-fat mayo or other healthier mayo of choice)
- 1 1/2 tablespoons reduced-fat sour cream
- 2 1/2 teaspoons water
- optional for garnish: additional chopped cilantro and sliced green onions
Instructions
- Preheat your grill on medium to medium-high heat.
- Lay your husked corn on the grill and close the lid, but turn the ears frequently so that they develop lots of caramelized grill marks without getting burned or charred. This will take about 5-10 minutes.
- Remove the corn from the grill and allow it to cool until you can safely handle it. (You can also grill the corn several hours in advance or a day ahead, if needed, and store it in the refrigerator once cooled.) When the corn is cool enough to handle, carefully cut the kernels from the cobs with a sharp knife (this is my favorite chef's knife) or a handy "corn stripper."
- Place 4 cups of corn kernels in a medium bowl (reserve any extra kernels for another use). Add cilantro, green onions, lime juice, kosher salt, and chipotle chile pepper powder. Stir to combine thoroughly.
- Stir in most of the cotija cheese, reserving just a little (about 1-3 teaspoons) to sprinkle on top of the finished salad.
- Spoon corn mixture onto a shallow serving platter or bowl, in a relatively thin layer.
- In a small bowl, combine mayonnaise, sour cream, and water until smooth. Drizzle over the corn mixture. (As shown in the photo in the post above, I like to do this by pouring the dressing mixture into a zipper bag and snipping the corner of the zipper bag for drizzling. You can also simply drizzle the dressing onto the salad from a spoon.)
- Garnish the top of the salad by sprinkling it with the reserved cotija cheese, and (if desired) with a little extra chopped cilantro and sliced green onions.
- Serve immediately.
Notes
Options for cooking corn: As discussed in greater detail in the post, you can alternately cook the corn however you choose, although grilling or roasting is preferred for this recipe, to produce toasty, caramelized flavors and color.
Make-ahead steps: This salad can be mostly made ahead of time. Combine grilled corn with the other ingredients in step 4, and then refrigerate the salad for up to a day ahead. Then proceed with the rest of the recipe before serving. I prefer to wait until just before serving to stir in the cheese, because I think the cheese flavor gets a little lost if it's mixed into the salad the day before. I also recommend that you don't drizzle the salad with the mayo-sour cream dressing mixture ahead of time, because it tends to thicken back up once it's refrigerated, and I like it to be a little runnier when I serve the salad.
Nutrition Information:
Yield: 9 servings Serving Size: 1/2 cupAmount Per Serving: Calories: 99Total Fat: 4gSaturated Fat: 2gTrans Fat: 0gUnsaturated Fat: 2gCholesterol: 8mgSodium: 293mgCarbohydrates: 15gFiber: 2gSugar: 3gProtein: 4g
Nutrition information should be considered an estimate only, and may vary depending on your choice of ingredients or preparation. No guarantees are made regarding allergies or dietary needs. Always consult a physician or dietician for specific advice and questions.

")


Really lovely. I love all of the ingredients in the salad. I have a standing joke that I don’t let people into my house if they don’t like cilantro!!!
Oh, I’m so happy you enjoyed this, Mimi! And I hear you about the cilantro … my only problem is that my own daughter doesn’t like it, so I just can’t make that rule lol! 😉 ~Shelley
Healthy salad recipe.
Definitely! So glad you liked the recipe! 😀 ~Shelley
Could I use frozen corn in a grill pan on the stove in the winter when corn on the cob isn’t available? Or what would you suggest for winter enjoyment? 🙂
I’m not sure how well frozen corn would work, Shannon – just because it doesn’t have quite the same texture and is already a bit softer and “mushy” from the freezing process. I think the flavors will still be delicious, but the texture just won’t be quite the same. If you try it, I’ll be interested to hear what you think, but my suggestion would be to save this one for summertime when you can get beautiful, fresh corn on the cob. Hang in there … summer’s gotta be just around the corner, right?!?! 😉 ~Shelley
I’m so glad I found this recipe. It was the PERFECT side for the carne asada I made on the grill this weekend. So wonderful!
Ohhhhh … this would be amazing next to carne asada – that sounds spectacular! Thanks for this lovely message – I’m delighted our recipe was a hit and a highlight of your delicious grilled meal! Have a terrific week, Christian! ~Shelley