Mint Chocolate Fudge (Christmas Fudge)
~ This super-easy Mint Chocolate Fudge will definitely put the holly-jolly in your holidays. It’s deeply chocolate-y, with a kiss of festive mint. And, it’s all prettied-up with an optional {but highly recommended} decorative swirl. Sensational for Christmas … but trust me on this … you’ll want to try my hack for keeping a little stockpile of “freezer fudge” for chocolate emergencies all year long, too! ~
This Recipe Is: • Ready in 30 Minutes or Less • Freezable • Make Ahead • Vegetarian • Gluten Free •
Need a moment? An ultra-rich, creamy and deeply, darkly decadent mmmmmmoment?
Yes. Yes, you do. We allll do.
And hey … we deserve a little luxury, don’t we? Yes ma’am! (Or sir … or kiddo … just YES YES YES!)
This Mint Chocolate Fudge is pure give-me-a-moment-while-I-take-a-deep-joyous-breath lusciousness.
But what you’re looking at here isn’t any ordinary Christmas fudge. Not just a pretty face.
Nope. There’s so much more to love about it!
Why You’ll Love This Mint Chocolate Fudge with All Your Heart
Sure, sure … we’ve already covered the deeply-darkly-chocolate-y part. Of course you’re gonna love that.
But it really does get even better! Like …
√ You don’t need a lot of time, or a lot of ingredients to make this.
√ You also don’t need fancy equipment. No candy thermometers and no double boilers. It’s a microwave fudge.
Because EASY luxury is better than stressful, complex, time-consuming luxury, that’s for darn sure.
√ And you know what else you don’t need? All that butter and sweetened condensed milk and gobs of extra sugar most other fudge recipes call for.
Nope nope and nope!
This too-good-to-be-true chocolate heaven is actually even a leeeeetle bit better for you. (Didn’t see that plot twist comin’ did ya?)
√ Plus, I’ve got a handy tweak that adapts this Mint Chocolate Fudge recipe to be a “freezer fudge.” Stash it away for weeks and weeks in the freezer, so you can pull out a nibble of chocolate joy any time you need it. Aaaaaaahhhh … at a moment’s notice. Any day. (‘Cause you deserve it!)

So let’s make you some ASAP!
How to Make This Minty Christmas Fudge (Anytime!)
First, let’s talk ingredients.
There aren’t many of them, but I do have a couple tips for you.
Ingredient Tip #1: PEPPERMINT Extract
We’re using PEPPERMINT extract here. Not spearmint. You also don’t want ones that are just labeled “mint” (those are generally spearmint-y, too).
This fudge has an Andes or Thin Mint vibe, and for that you want to use PEPPERMINT extract.
If you’d like a slightly more minty fudge, go with 2 teaspoons of the peppermint extract. Or, scale back to 1 1/2 teaspoons for a more chocolate-forward flavor. Both are great, depending on how minty you’re feelin’.
Ingredient Tip #2: Choosing Coconut Oil
Coconut oil is solid at room temperature, but quickly and easily melts into the fudge mixture.
At the store, you’ll typically find it sold in jars, as either “refined” or “unrefined.” Virgin or unrefined coconut oil tends to have a more pronounced tropical, coconut-y flavor than refined coconut oil. But, you’re using such a small amount in this recipe that it’s pretty unnoticeable, either way. Use whichever you have on hand.
Step #1
Grab a microwave-safe bowl, and stir together 1/2 cup + 2 teaspoons of nonfat evaporated milk, and your peppermint extract.
(Yes, I know that 1/2 cup + 2 teaspoons of milk sounds like a really weird measurement. But, I’ve tested this recipe at least 6 times, slightly tweaking the amount of evaporated milk … and that amount was the winner, for sure. Those extra 2 teaspoons bring the fudge to the perfect texture I’m shooting for in a fudge recipe.)
Pro Tip: Evaporated Milk
Evaporated milk is made from regular milk, with a large amount of the liquid evaporated out. It’s NOT the same as sweetened, condensed milk. (I go into a lot more detail about evaporated milk in my post for Decadent 3-Ingredient Fudge.)
Before you open your can of evaporated milk, be sure to follow the directions on the can that say to SHAKE WELL. Evaporated milk often separates, with a thick layer forming at the bottom of the can. Since we’re using it to create thickness and creamy body in this fudge, you WANT that silky layer – don’t leave it behind! If shaking the can around before you open it doesn’t get all those solids incorporated back in, then briskly whisk them into the milk before using it.
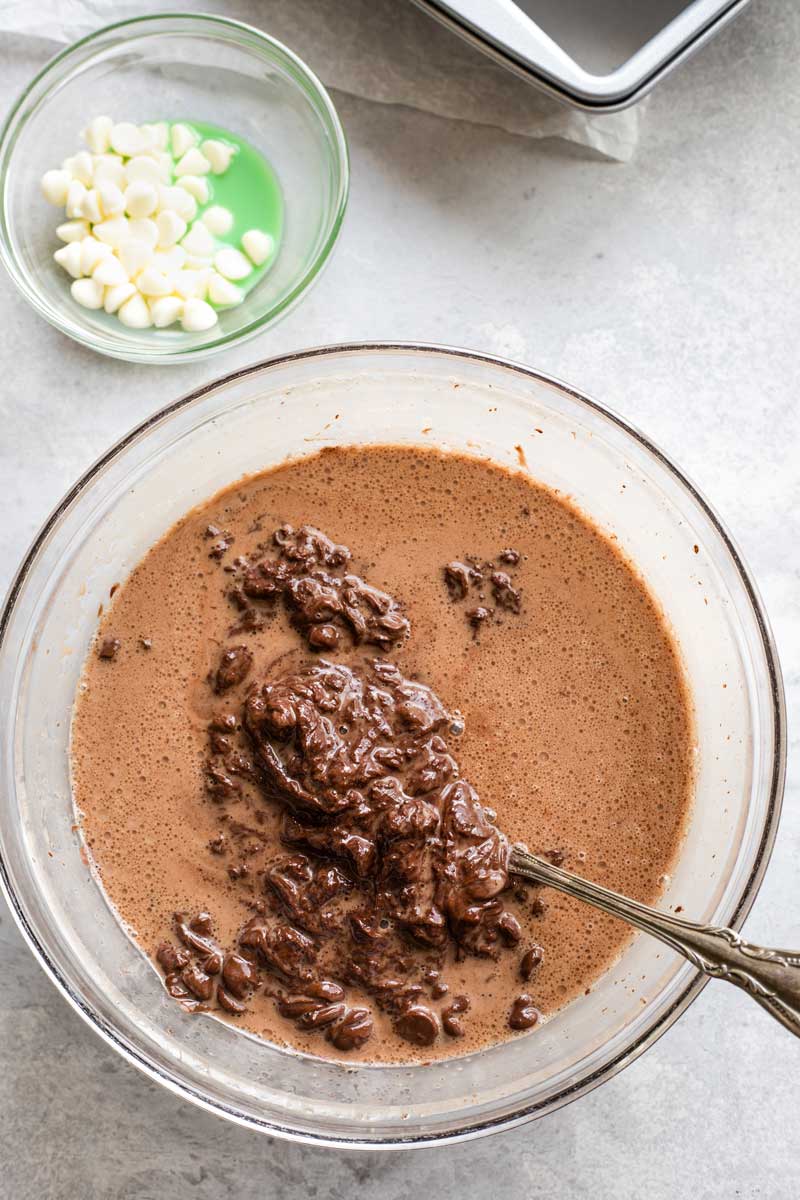
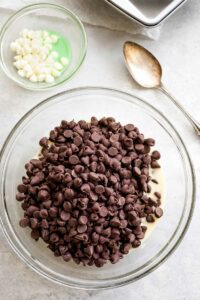
Add 1 teaspoon of coconut oil and the semi-sweet chocolate chips to your bowl.
(Heads-up: As I’ll explain more later, if you’re planning to do the optional drizzle, I’d suggest getting those ingredients ready in a small bowl now, too.)

Step #2
Microwave the fudge mixture for about 1 1/2 minutes (1 minute 20 seconds if you have a powerful microwave).
Step #3
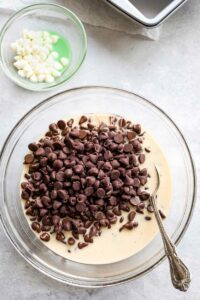
When you take your bowl of warmed ingredients out of the microwave, immediately begin stirring it, until it’s completely smooth.
Now, don’t panic here (because you probably will)!
At first, it’ll seem like this isn’t quite going to work … like it’s not quite going to get smooth. I feel that way every single time I make this fudge recipe.

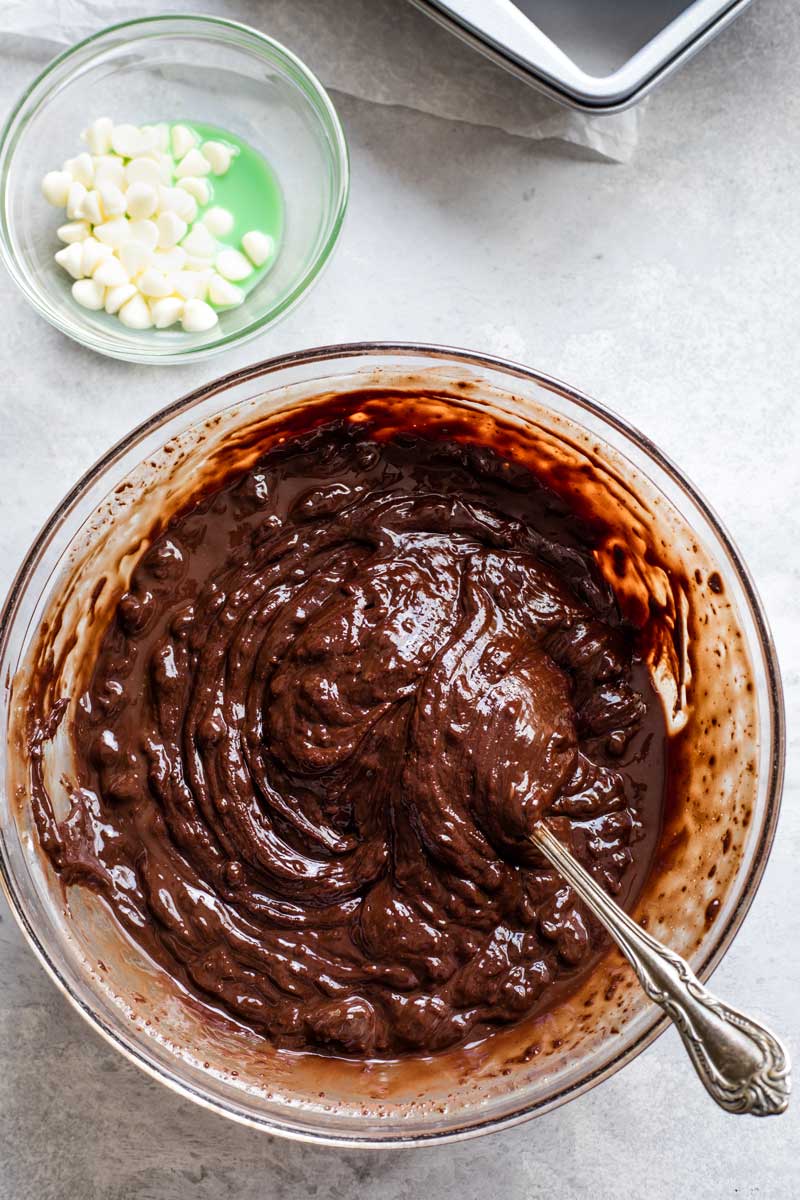
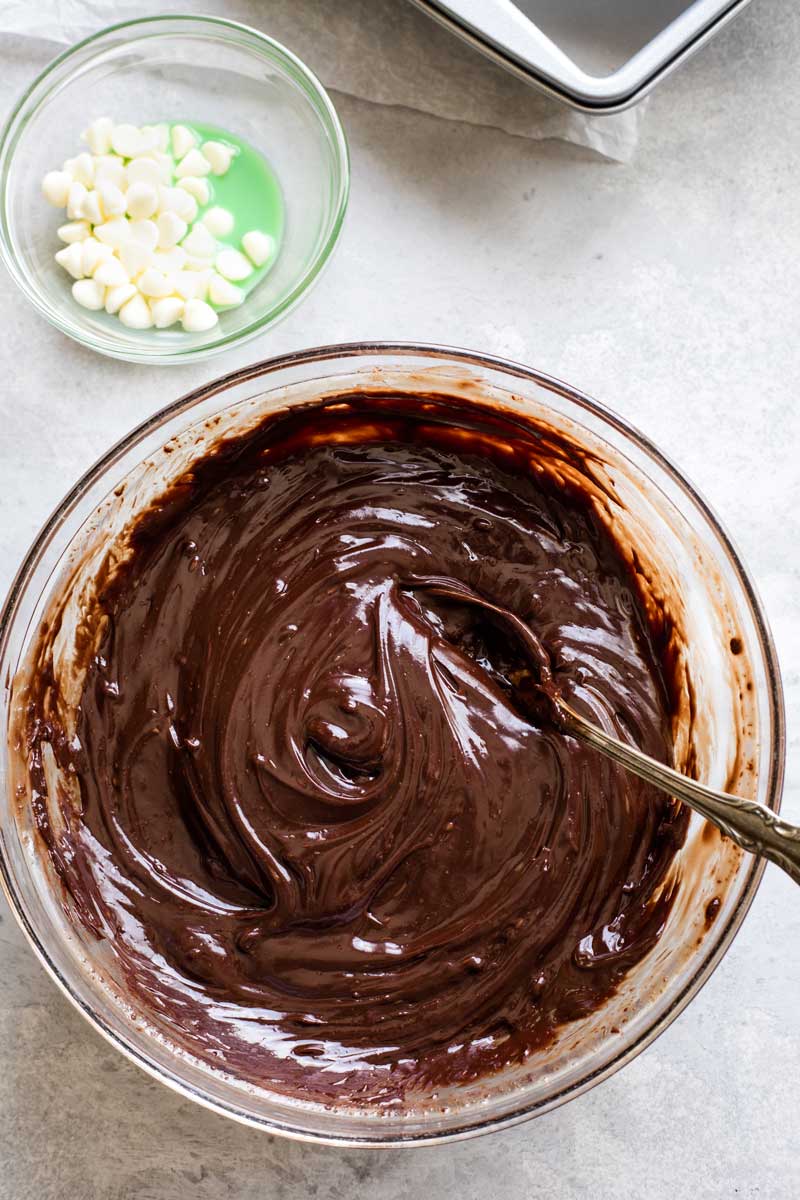
But don’t worry … just keep on stirring.
And whatever you do … DON’T microwave your fudge mixture again (which could scorch it). Just use the residual heat to continue melting all the chocolate chips until they’re velvety smooth.
Equipment Tip: Skipping the Double Boiler
Just like with our 3-Ingredient Chocolate Dip and that 3-Ingredient Fudge I mentioned before, the reason we can get away with skipping the double-boiler and using this easy technique to make microwave fudge is because we gently heat the milk and the chocolate together, rather than introducing the milk into the mixture after we’ve heated the chocolate.
As a result, instead of causing the chocolate to seize, the warm milk helps to gently melt the chocolate as it smoothly incorporates into the fudgy mixture.
Step #4
Ok. Did you stir and stir (and NOT panic)? Then you should have a luscious, smooth bowl of thick chocolate lava.
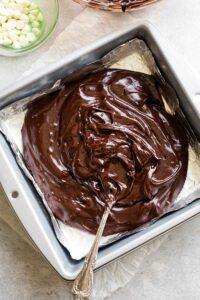
Resist the urge to grab a spoon and start eating straightaway. (Ok ok … maybe a little spoonful. I can’t blame you!) Instead of eating it all in this enticing lava stage, though, what you really need to do is pour your warm fudge mixture into an 8×8″ pan.
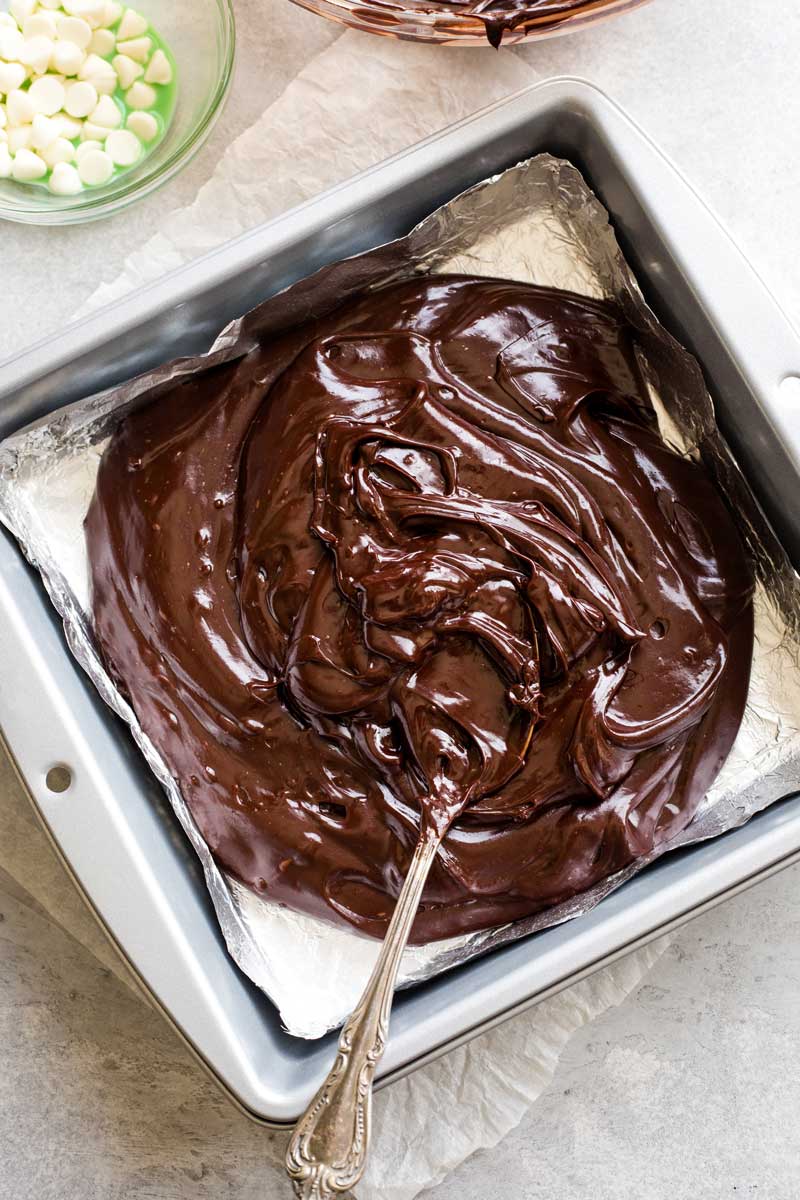
Pro Tip: Lining the Pan
For easy removal and cleanup, I like to line my pan with aluminum foil that I’ve lightly sprayed with nonstick cooking spray.
I’ve tried a number of different strategies and materials, and the sprayed foil consistently performs the best.
This is totally optional, but makes it super easy to remove the whole slab of Mint Chocolate Fudge from the pan, all at once. (You’ll simply peel away the foil later, after your fudge has completely set.)
Use a rubber scraper to spread the fudge mixture evenly in your pan. Sometimes I also find it’s helpful to tap or gently shake the pan to level the mixture out.
Step #5
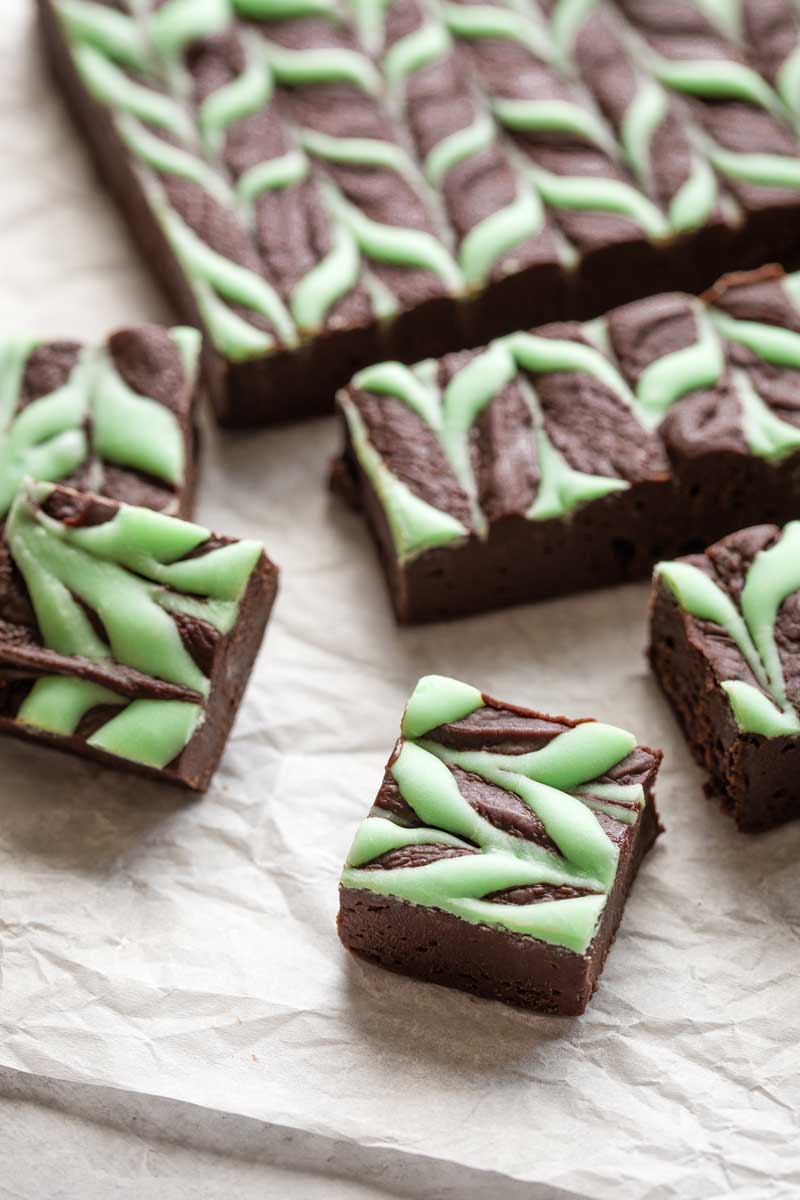
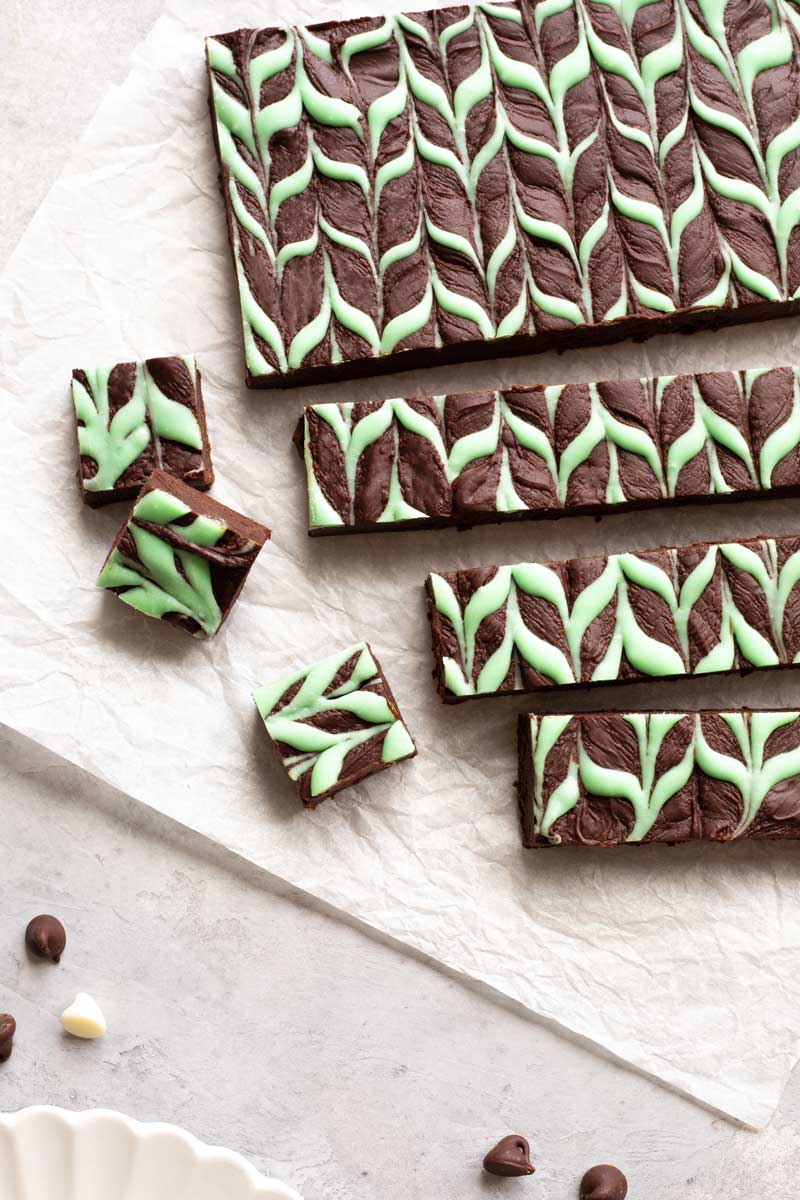
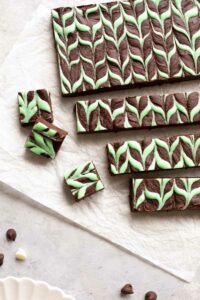
Now for that optional (but oh-so-recommended) festive drizzle!
You want to do this step fairly quickly (before your chocolate base starts to harden and set in the pan). In fact, I highly recommend that you have the ingredients for the drizzle all measured out in a little bowl, ready for “go time.”
All you need is a teaspoon of evaporated milk, about 3-4 drops of peppermint extract, and 2 tablespoons of white chocolate chips.
You can also add a drop of green food coloring, if you’d like. I’ve made this fudge both with and without the green. It’s pretty with a white swirl, too. But somehow the green really says “I’m minty!”
At any rate, you microwave that little bowl very briefly – for only about 15 seconds.
Then, just like with the chocolate fudge base, you stir and stir until it’s smooth.
Next, spoon the swirl mixture into the corner of a sandwich-sized zipper bag and snip off a small piece of the corner.
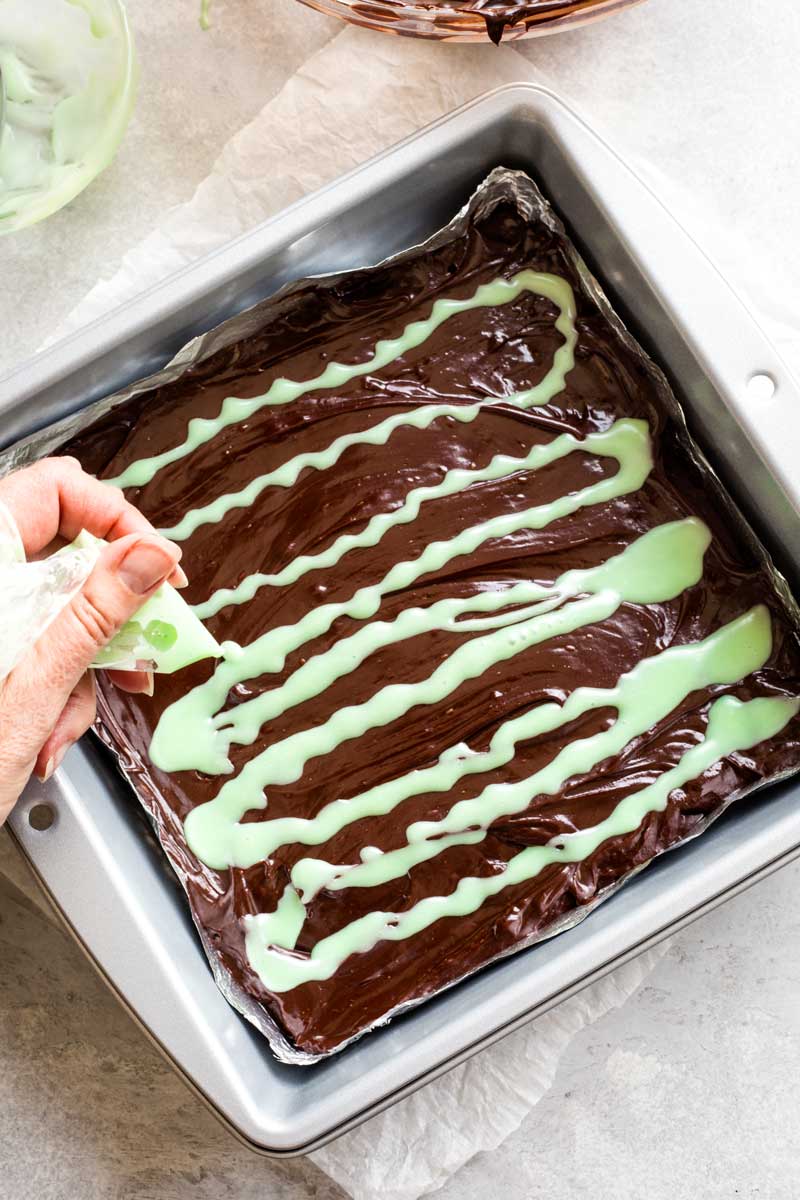
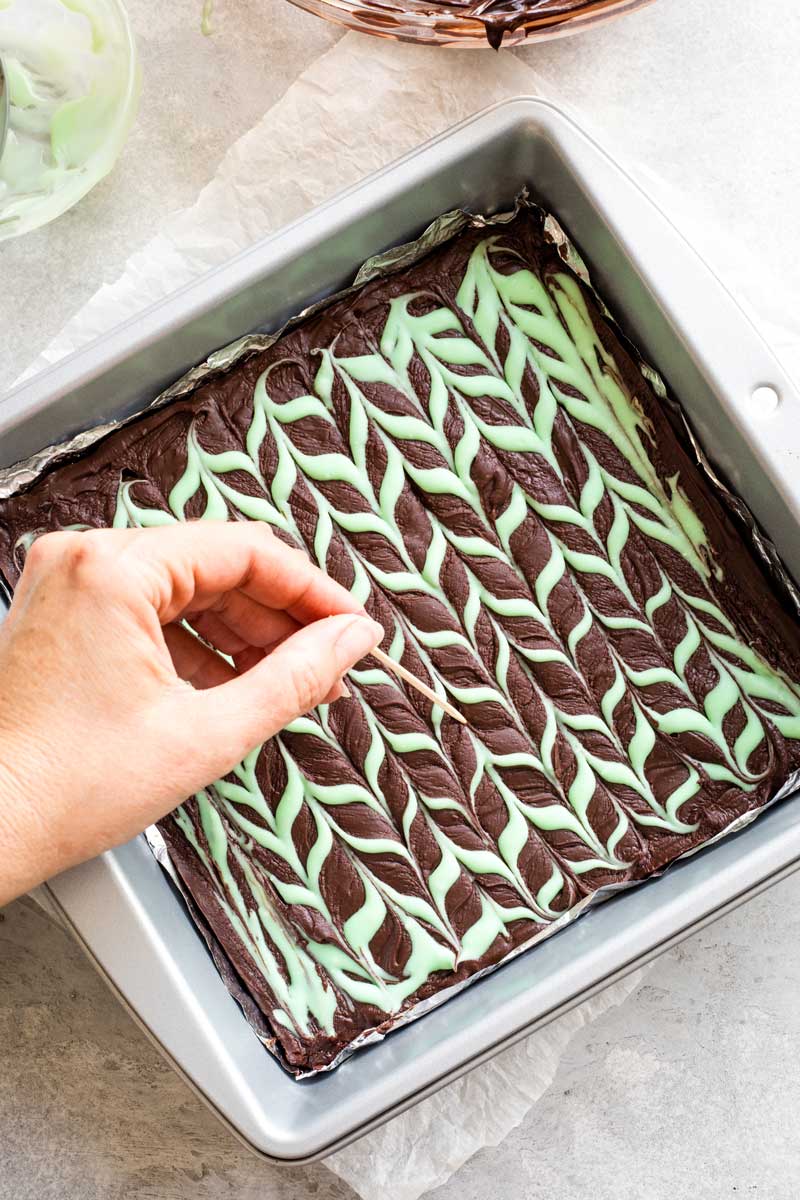
Drizzle it onto the chocolate fudge in lines running all the same direction.
Then run a toothpick (shallowly) through the drizzle lines, in the opposite direction (like I show in the photos above).
Step #6
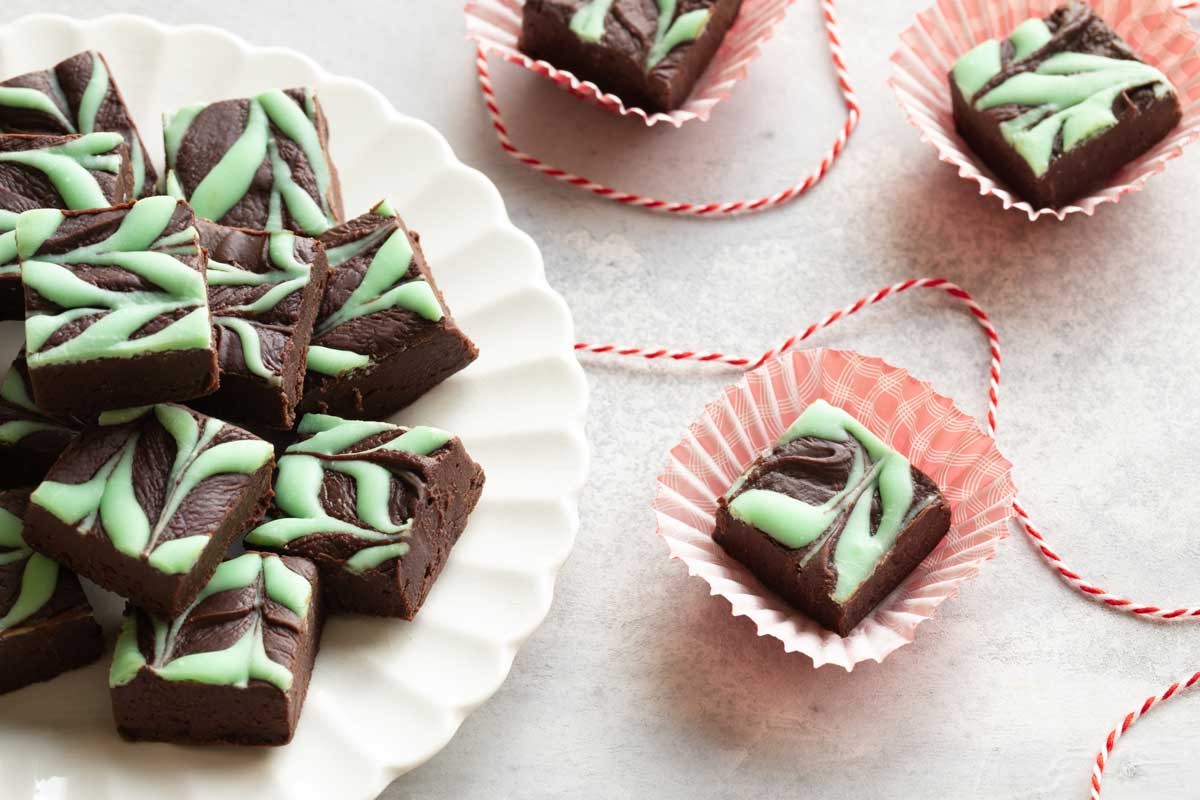
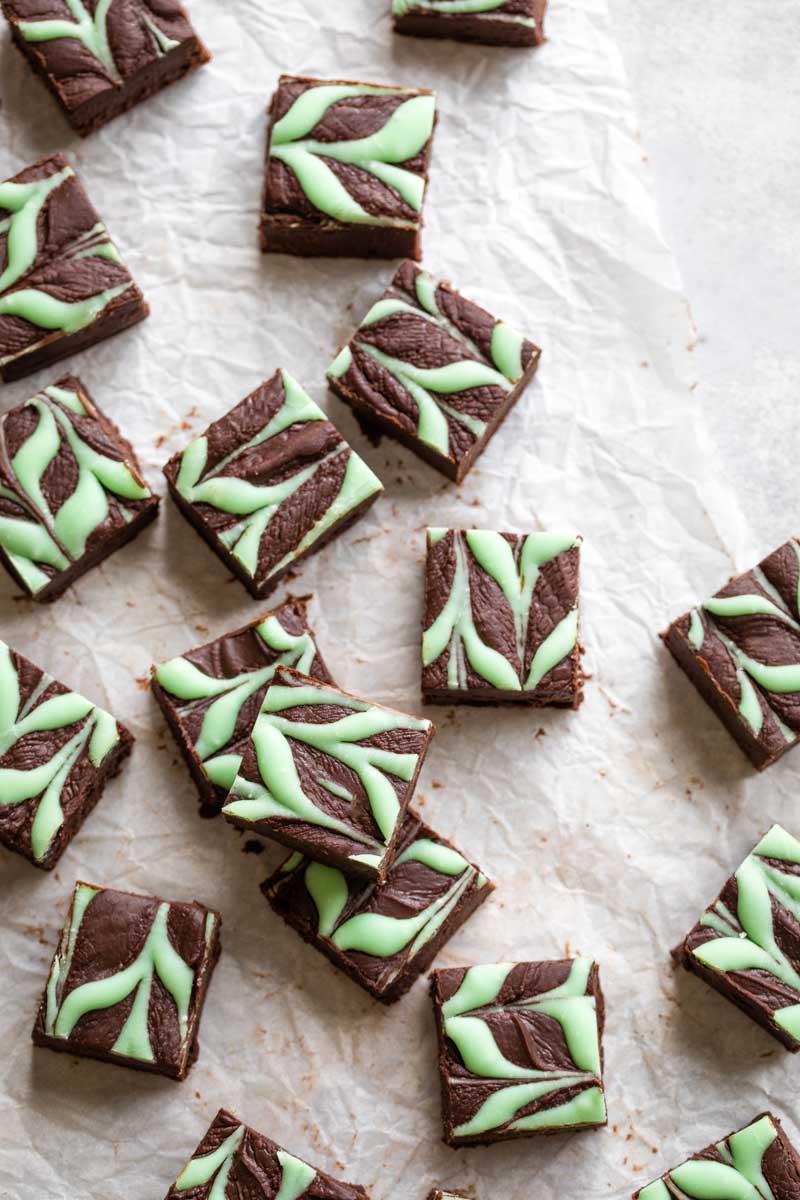
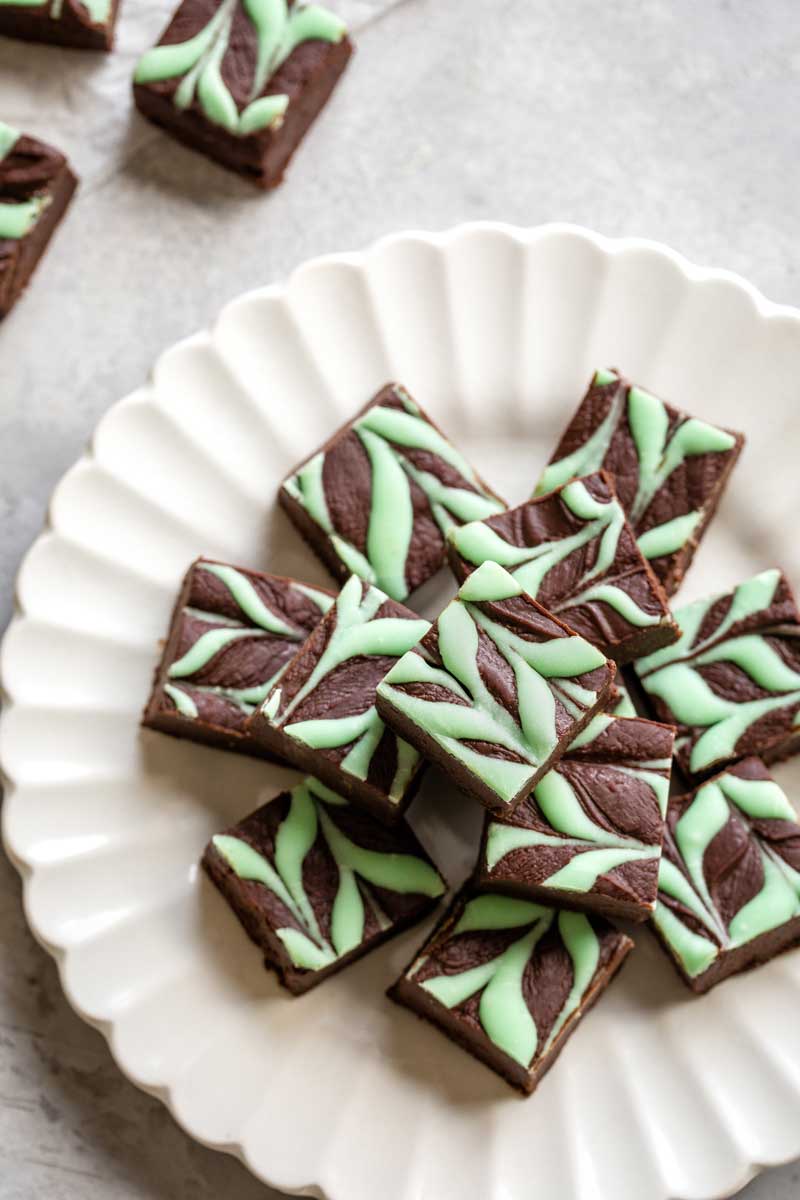
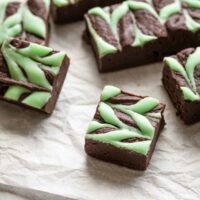
Refrigerate your fudge until it’s solid, and then cut it into squares.
Nibble, mmmmmmmm … repeat. Maybe share a little with someone you really, really like. (Or hoard it all for yourself – your choice!)
Why This Fudge Recipe Works
You might be surprised that you can get such decadent fudge without the butter … and the heaps of sugar … and the sugar-y sweetened condensed milk that most other fudge recipes use.
But, one bite and you’ll be convinced!
By making our Mint Chocolate Fudge recipe without condensed milk (subbing evaporated milk instead) … all we’ve basically done is slash sugar and calories. It’s the same strategy we’ve used for years in making our 3-Ingredient Fudge (which inspired this minty Christmas Fudge recipe).
Since both kinds of milk are evaporated down to a thicker, richer consistency, we still get the same decadent creaminess and silky, fudgy texture from the evaporated milk as we would from the condensed milk.
Just a tiny dab of coconut oil handily stands in for the butter.
And, since we’re shooting for a luscious, deeply, darkly chocolate-y fudge experience here, we definitely don’t want our fudge to be sickeningly, over-the-top sweet. No need for either that sweetened condensed milk, or for loads of additional sugar!
How to Make Freezer Fudge
This fudge can absolutely be made ahead, wrapped tightly, and stashed in the freezer for several weeks. It’s a terrific make-ahead Christmas fudge to add to cookie platters or share as teacher and hostess gifts for the holidays. Let it come to room temp before sharing, and everyone will LOVE it!
BUT …
When I say “Freezer Fudge,” that’s not really what I’m talking about. For true Freezer Fudge, you shouldn’t have to let it come to room temperature before enjoying a perfect, fudge-y texture!
To create Freezer Fudge (that you can enjoy at a moment’s notice, whenever a chocolate emergency strikes), I sometimes tweak the base recipe just slightly, so my fudge actually comes out of the freezer at a softer, absolutely ideal texture, without having to thaw first.
I’m talking immediate chocolate therapy you can pull out and savor … right when you NEED it! Straight from the freezer, no thawing required. Yes, please!
If that’s more your style, all you have to do is tweak the ingredients in the base layer:
- increase the evaporated milk to 2/3 cup
- increase the coconut oil to 1 1/2 teaspoons
This yields a softer texture, straight from the freezer.
You’re armed and ready for any chocolate emergency the day might throw at ya! Pull a little square of chocolate joy from the freezer and ….. aaaaaahhhhhhhhh … much better!
FAQs At-a-Glance
Sure! It refrigerates great for a week or more, and freezes well, too! Just let it come to room temperature, and enjoy. This is a great Christmas fudge recipe to help you get a jumpstart on holiday sweets and cookie trays. And, it’s a wonderful DIY gift you can make ahead in big batches to share with neighbors, teachers, coaches, and party hosts.
No. Although they sit next to each other on grocery store shelves, they’re not interchangeable.
Sure! When I was testing the precise measurements for this recipe, I made quite a few half batches. Simply cut all recipe ingredients in half, and use an 8″ loaf pan instead of an 8×8 square pan.
I recommend storing fudge in either the fridge or freezer, so it lasts as long as possible and stays nice and fresh. Fudge can dry out, though, so I also recommend wrapping it tightly in a layer or two of wax paper or plastic, and then slipping it inside an air-tight zipper bag.
Try this recipe as a Christmas fudge for the holidays this year. So easy, so pretty, and my-oh-my sooooooo indulgent!
And if you end up a tiny bit obsessed … and find yourself making this decadent Mint Chocolate Fudge all year long? Maybe even with a “freezer fudge” version stashed in your freezer at all times??
Well hey, all I can say is Join the Club! (I think I’ve got about 2 slabs in my freezer right now, too! 😉 )
~ by Shelley
Love the Recipe? • Were My Tips Helpful?
__________
Please leave a 5-star rating by clicking on the stars in the recipe card below. I truly appreciate all your wonderful feedback!
Mint Chocolate Fudge (aka Christmas Fudge)
Ingredients
Fudge:
- ½ cup + 2 teaspoons evaporated fat free milk (NOT sweetened condensed milk)
- 1½ – 2 teaspoons pure peppermint extract (not mint or spearmint) (see note)
- 1 teaspoon coconut oil
- 3 cups semi-sweet chocolate chips
Swirl (optional):
- 1 teaspoon evaporated fat free milk
- 3-4 drops pure peppermint extract
- 1 drops green food coloring (optional)
- 2 tablespoons white chocolate chips (we use Nestlé)
Instructions
- In a microwave-safe bowl, combine ½ cup + 2 teaspoons milk and 1½ – 2 teaspoons peppermint extract. Then add 1 teaspoon coconut oil and semi-sweet chocolate chips.

- Microwave on high for approximately 1 minute 20 seconds to 1 minute 30 seconds (the exact timing can vary slightly depending on the power and wattage of your microwave).
- Stir until completely smooth and well-incorporated. (Do not microwave again; use the residual heat to continue melting all chips completely. Refer to full series of photos in post above, if needed.)
- Pour the mixture into an ungreased 8×8" pan (or to make the entire block easier to remove, you can line the pan with foil that's been lightly coated with cooking spray). Smooth the top and tap or gently shake the pan to level the mixture.
- For the optional swirl (if using, measure and mix this at the same time you measure and mix the semi-sweet fudge layer, so it's ready to microwave as soon as you're done with the base layer, before the base layer begins to set up and thicken): Combine 1 teaspoon milk, 3-4 drops peppermint extract, and food coloring (if using) in a small bowl. Add white chocolate chips and microwave for about 15 seconds, then stir until smooth. Quickly spoon the mixture into the corner of a sandwich-sized zipper bag and snip off a small piece of the corner. Drizzle onto the chocolate fudge base layer in one direction, and then run a toothpick shallowly through, in the opposite direction (refer to photos in post).
- Refrigerate fudge until solid before cutting.


Notes
Nutrition
* Nutrition information should be considered an estimate only, and may vary depending on your choice of ingredients or preparation. No guarantees are made regarding allergies or dietary needs. Always consult a physician or dietician for specific advice and questions.


")
")
Used full 2ts because we love peppermint!
Hi, Sandra! I just replied to your email (sorry for the delay – I was traveling this past weekend), and now see your lovely review, so I know you must have made it and loved it! I’m so glad – and I want you to know how much i appreciate that you took the time to leave such kind feedback. It’s truly appreciated! Happy holidays! 😀 ~Shelley
You really get a lot with this recipe! It tastes amazing and is highly guilt-free. Will make again for sure!