Blistered Green Beans
~ These Blistered Green Beans are the perfect accompaniment to practically any meal! You basically need one ingredient: green beans! Although they’re the ultimate in simplicity, they don’t taste simple at all. You’ll be surprised how complex and delicious they are, with deep, caramelized flavors thanks to the magic of oven-roasting. So be warned: they disappear really fast, and you just might want to make a double batch! ~


This Recipe Is: • Ready in 30 Minutes or Less • Includes Make-Ahead Steps • Vegan (and Vegetarian) • Gluten Free • Paleo •

You know I tend to get all poetic and maybe a bit teary-eyed when I start talking about roasted vegetables.
No really.
We loooove them.
From easy Roasted Broccoli and Cauliflower tossed with pasta, to crispy and perfectly golden oven-roasted potatoes … from Parmesan Roasted Broccoli Stalk Chips, to the Roasted Green Beans with Balsamic-Browned Butter that sort of started it all …
Roasting creates veggie magic. It deepens the flavors as it creates those gorgeous, caramelized, toasty brown spots.

I typically find that the usual one-pound purchase of broccoli or asparagus isn’t enough anymore. Not when I’m roasting! My family easily plows through twice that amount, eagerly chowing through delicious veggie nutrition.
And I know I’m not the only one … after trying some of our roasted veggie recipes, my friends have exclaimed to me about this exact same phenomenon: Roasting Vegetables = Magic. Abracadabra. It’s that simple.
I just had to share this ultra-simple recipe with you next. We featured these Blistered Green Beans alongside the Red-Miso Salmon recipe we shared last month … so I definitely wanna let you in on how to create these yourself, to go with your own salmon! Plus, as summer winds down, green bean season is at its peak. Perfect timing!

Why You Have to Make These Blistered Green Beans (Now!)
Need more convincing? One more little shove to inspire you to grab up extra green beans at the farm market this weekend? Well, I’ve got five great reasons for you!
1) This is basically a 1-ingredient recipe! – Since nobody really counts salt, pepper or olive oil … well, that leaves only one other thing you need. Green beans. That’s about as simple as it gets! Sure, we’ve got plenty of 5-ingredient, even 3-ingredient, recipes here at THK. But 1-ingredient? This is a first! Doesn’t get any easier than that!

2) Your kids will eat their veggies! – And so will everyone else. It’s that roasting magic thing I keep talking about. Honestly … I almost had to kick Ty out of the photo shoot the day we photographed these because he kept sneaking green beans off the plate while we worked. They were even unbelievable cold after being photographed for an hour or two! Trust me … veggie magic.
3) Total adaptability! – These are the perfect starting point, a beautiful blank canvas. While they’re absolutely delicious right out of the oven, they’re also happy to be changed up to fit your mood or your main course. Wanna sprinkle on a little parmesan or some garden-fresh herbs? Have at it! Maybe a little soy sauce for Asian flair? Okey-doke! (You might want to scale back the salt in the recipe slightly if you’re adding salty toppings like parm or soy sauce, but that’s easy to adjust as you’d like.) We always drizzle extra Red-Miso Glaze on top when we serve these alongside our Miso Salmon. You get the idea. Be creative … these green beans won’t mind a bit!
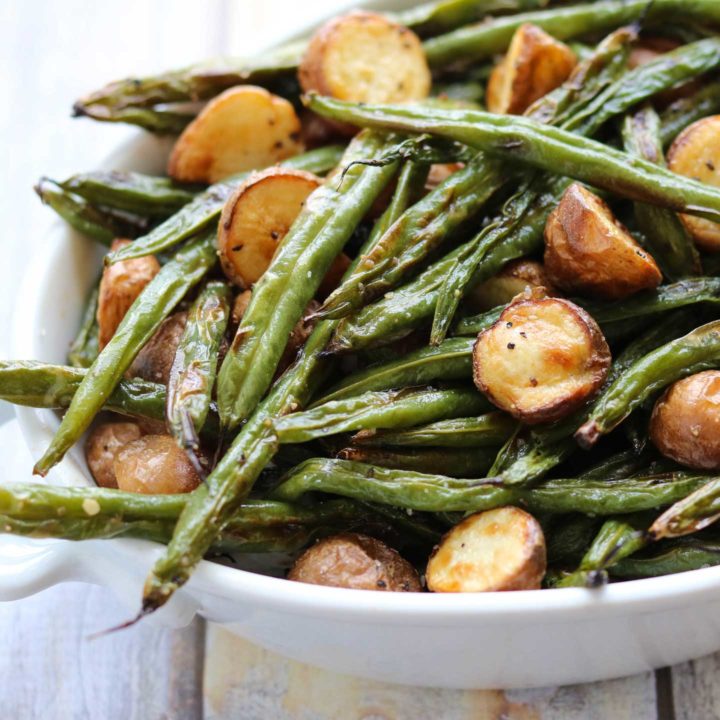
4) Add Some Potatoes! – And while we’re talking adaptable, let me suggest one more thing you definitely need to try. Get a second sheet pan going with some pretty little baby red-skin potatoes. Roast them right along with the green beans and toss them all together at the end. While the green beans get all blister-y and delicious, the potatoes develop gorgeous, crispy exteriors and fluffy interiors. They’re perfect combined together – so easy, so good! (Side note: you can even try this with Rosemary Roasted Potatoes!)

5) Thanksgiving, Updated! – You know that classic, mushroom-soup-goo green bean casserole so many Americans serve at Thanksgiving because, well, because it’s tradition? Ahem … may I suggest a new idea?!?! These so-simple, so-delicious green beans are a perfect Thanksgiving or holiday side dish. (See ya later, mushroom-soup-goo!)
Roasted Green Bean Tips
Guys, this recipe is so easy that you really don’t need many tips. But in our never-ending quest to give you more help than you probably reasonably need, let me offer a couple suggestions:
- Tails or no tails? – Just like with our recipe for Roasted Green Beans with Balsamic Browned Butter, it’s totally up to you whether you cut off the little green bean tails, along with the stems, or leave them on. I personally like the crunchy little roasted tails – but it’s entirely up to you.

- Spread ‘Em Out! – As we say time and again when we’re talking about roasting: it’s really important that you spread the green beans out, rather than piling them on top of each other. That ensures they’ll actually roast rather than steam. If you’re doing a large- or double-batch, always use a second baking sheet if you need to – it’s truly key to perfect roasting.

- Just How Blistered Do You Want These? – Again … it’s up to you. As we suggest on the recipe card, if you’d rather go for more of a lightly roasted green bean recipe than full-on blistered glory, just cut back the roasting times slightly (or move your beans further from your oven’s heating element).

- Make-Ahead Tip – Just like with my {BELOVED} Roasted Asparagus, you can prep these green beans ahead of time, so dinnertime is quicker and easier! In fact, you can rinse and stem the green beans earlier in the day, or even the day before … and stash them in the fridge. You can get even further ahead by spreading all the beans out on a parchment-lined baking sheet and wrapping the whole thing in plastic, refrigerated until go-time. Then simply fire up the oven, toss those beans with the oil, salt and pepper … and you’re on!

Now, head straight to the nearest farm stand and make these tonight. And do yourself a favor – just go ahead and grab enough green beens to make a double-batch, and probably to make these again tomorrow, too. Trust me – you’ll want to!
Blistered Green Beans
The perfect accompaniment to practically any meal! You’ll be surprised how complex and delicious such a simple recipe tastes!
• Ready in 30 Minutes or Less • Includes Make-Ahead Steps • Vegan (and Vegetarian) • Gluten Free • Paleo •
Ingredients
- 1 pound fresh green beans, rinsed, trimmed and dried
- 1 1/2 teaspoons extra virgin olive oil
- 1/2 kosher salt (plus up to an additional 1/4 teaspoon at end, if needed)
- 1/4 teaspoon black pepper
Instructions
- Preheat oven to 475°F. Line a baking sheet with parchment paper.
- Toss green beans with oil, and then sprinkle with 1/2 teaspoon salt and the pepper. (You can do this in a bowl before spreading the beans on the baking sheet, or you can do it directly on the baking sheet. Either way, just be sure that all the beans are evenly coated in oil, and that the salt and pepper are evenly distributed.)
- Arrange green beans in a single layer on the parchment-lined baking sheet. Don't over-crowd them (use a second baking sheet if needed), or they won't roast properly.
- Roast beans for about 10 minutes (until some browned, blistered spots are beginning to form), and then stir and flip them over, again spreading them evenly out across the baking sheet.
- Return beans to the oven and continue roasting for about another 10 minutes (optionally stirring one more time halfway through), until the green beans are roasted and blistered to your liking.
- Serve immediately, sprinkling with up to an additional 1/4 teaspoon salt (to taste) if needed, so flavor pops.
Notes
Trimming green beans: I prefer to leave the "tails" of the green beans on, but that's entirely optional, and if you prefer, you can trim away the tails as you cut off the stem ends.
Doneness: For this "blistered" recipe, I do truly like for there to be deeply roasted spots on the green beans. However, if you would like yours to be slightly less roasted and blistered, you can simply reduce the total roasting time. Instead of 10 minutes before stirring, followed by another 10 (20 minutes total), you could try just 8-9 minutes before and after stirring (16-18 minutes total). You can also somewhat control the blistering based on how close your baking sheet is to your oven's heating element (for less blistering, try moving the beans further away).
Make-ahead tips: You can rinse and stem the green beans a few hours earlier or the day before. Make sure they are thoroughly dry, and then store them, wrapped, in the refrigerator. You can also go one step further and spread the rinsed, trimmed, and dried beans on the parchment-lined baking sheet, wrapping the whole sheet in plastic, and refrigerating until you're ready to continue with the recipe.
To make Blistered Green Beans with Red Potatoes: Toss 1 pound of red potatoes (cut into about 1-inch pieces) with an additional 1 1/2 teaspoons of extra virgin olive oil, 3/4 teaspoon kosher salt and 1/4 teaspoon black pepper. Spread them evenly on an additional parchment-lined baking sheet (separate from the green beans) and proceed with cooking instructions above. However, once the green beans are done cooking and have been removed from oven, the potatoes should be left in the oven for approximately 5 additional minutes. (As a side note, because this recipe is labeled as paleo: many very strict paleo regimens exclude potatoes, so while the Blistered Green Beans are paleo, combining the beans with potatoes may or may not fit your paleo regimen.)
Nutrition Information:
Yield: 4 servings Serving Size: 1/2 cupAmount Per Serving: Calories: 55Total Fat: 2gSaturated Fat: 0gTrans Fat: 0gUnsaturated Fat: 2gCholesterol: 0mgSodium: 246mgCarbohydrates: 9gFiber: 4gSugar: 4gProtein: 2g
Calculation based on using 1/2 teaspoon salt. Nutrition information should be considered an estimate only, and may vary depending on your choice of ingredients or preparation. No guarantees are made regarding allergies or dietary needs. Always consult a physician or dietician for specific advice and questions.


Has anyone tried this recipe with frozen fresh green beans?
Hi, Lynn! I’ve personally never tried this with frozen green beans. I think that frozen green beans should work alright in this recipe, but you may not get quite the same results. If you’re going to try it, I would be sure to thaw the beans completely, and make sure they’re completely dry before tossing them with the olive oil mixture. Frozen green beans tend to be super wet, which can keep them from roasting as well. Additionally, they may not need to roast for as long, because the freezing process will have already partially broken down their cellular structure. However, I could definitely still see the recipe working — just maybe not quite as perfectly. If you do try it out, I’d be super interested to hear about your results! Hope that’s helpful. 🙂
~Amy
I love roasted veggies too!! I’ve never tried blistered green beans, but I know I’d love em
I cook A LOT, and your web site is my #1 choice every time when I want to find a recipe. I have five children (one is married and not in the house – everyday, anyway ? ) and between them, my husband, and our children’s friends, I ALWAYS find something great to make. You have definitely managed to marry taste with healthful eating ? ! And I love the new design of the web site, too! Keep up the awesome work ? !!
PS – Sometimes the tips and accompanying stories are my favorite part of my visits to Two Healthy Kitchens ? !
Milia – I can’t even begin to tell you how much this means to me. Truly. I read it and immediately thought, “Oh my gosh – I just want to cry!” (Happy tears, of course!) That is so totally my family’s goal with this site – to combine healthy eating with truly delicious recipes, and to offer little fun stories and useful tips along the way. I’m honestly not sure I could have crafted a higher compliment, if I’d drafted it myself. Thank you, thank you – more than you know! We will sincerely try to continue to bring you recipes that are worthy of such praise – I hope you’ll be inspired and find delicious ideas for years to come! And, I hope you have a day that’s as wonderful and fulfilling as my day became when I read your message! ~Shelley
Made the these this evening to accompany our cheeseburger pie. Yummy! I opted for a little less baking time, about 15 minutes total. Great recipe.
Hi, Sue! I’m so thrilled you guys liked these green beans! And wow – you are always one of the quickest to try our new recipes! I can always count on you for quick feedback – thank you so much for that! 😀 ~Shelley
The new web-site looks wonderful and easy to navigate!
Thank you so, so much, Chrissy! I’m especially happy to hear that you found it easy to navigate! That was one of my absolute biggest priorities with this redesign – ensuring that our readers could easily find exactly what they were looking for and that it was quick and easy to move through the site. My amazing tech team at J. Louis Technology worked really, really hard and created some serious magic … and came up with solutions that FAR exceeded my expectations. I’m just ecstatic that, as a reader who’s really familiar with our old site, you immediately noticed how easy this new site is to navigate. Truly appreciate this feedback – it’s exactly what I was hoping to hear! 😀 ~Shelley