Old-Fashioned Date Bar Recipe
~ Dating back more than half a century ago, this Date Bar recipe was a Christmastime treat on the Ohio farm where my mother grew up. They’re a special, old-fashioned cookie for the holidays – but honestly, we love them so much that we make them all year ’round. They’re super-easy and freezable, too, so you can always keep a stash on hand! ~
This Recipe Is: • Freezable • Make Ahead • Vegetarian •

Especially around the holidays, we all want to create that welcoming, festive feeling for our families. Like cooking those lovingly made foods that evoke fond memories and a happy sense of home. You know what I mean. The recipes that fill the entire house with delicious smells and wrap everyone who enters in a comforting, “Hurray, you’re home!” hug.
These yummy little Date Bars somehow manage to do just that.
They actually taste vintage. (Probably because they are!) Simple homemade treats that conjure up happy, cozy feelings.
Uncomplicated and just plain good.
The kind of good that gets better and better and kind of sneakily addictive, as you reach for another. And then for just one more. They’re:
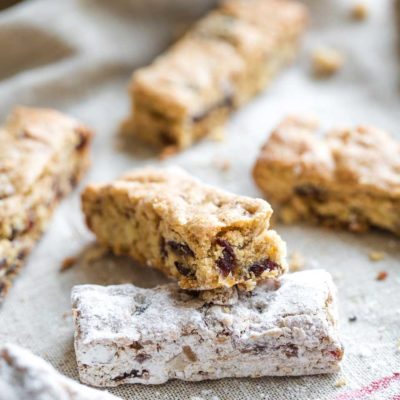
- lightly crispy on the outside, and then so perfectly soft and chewy on the inside,
- with the warm caramely-sweet flavor of dates,
- and a little bit of nutty crunch from the walnuts,
- festively finished off with a light coating of snowy powdered sugar.

Mmmmmm …
Such classic cookies, and these always, always disappear fast!
My Mother’s Childhood Recipe
I found this Date Bar recipe (originally called “Date Sticks”) tucked away in the treasured family recipe box I inherited from my Grandma.
The recipe card is written out in my own mom’s childhood hand, from nearly 70 years ago, when she was just a girl. It had been filed away with all the other family recipes, just waiting to be rediscovered and loved anew (like our favorite Vintage Recipe for Easy Bread, that we found waiting there in the recipe box, too, and the Creamed Tuna on Toast recipe I’ve adored since I was a little girl).

Unearthing that recipe card brought back a flood of memories for my mom to share with us. Of how her family always used to make these Date Bars as special treats at Christmastime. And how, as a little girl, she would carefully roll each one in its pretty coating of powdered sugar.
Even better than just savoring the memories with her, though … we actually baked this Date Bar recipe together, too. She and Ty and I gathered around the kitchen counter – three generations of my family, laughing and reminiscing, as we squinted at that stained and yellowed recipe card that was scrawled with my mom’s faded, girlish cursive.
From my mother’s long-ago childhood memories sprang brand-new family memories. Priceless.
Together, we wondered and hoped: would they be as good as she remembered? (Spoiler alert: YES!)
That first batch of Date Nut Bars came out of the oven gorgeously golden brown. So far, so good!
We debated and fussed over what size to cut them. Did she remember exactly how big they were meant to be??
And could we just sprinkle them with sugar on top? No, no. She definitely remembered that she was in charge of rolling them in sugar. (I love imagining my mom as a tiny girl, the youngest of four jostling, boisterous kids, carefully taking charge of her job to roll each cookie in its fluffy, snowy coating.)

We waited for them to cool. (Ok … maybe we didn’t quite wait for them to be all the way cool. Maybe we cheated a little. It happens.)
And with the first curious nibble, we thought, hey, these really are good! But with the second and third nibbles, we realized, no … these are great!
Addictive, even.
They kind of sneak up on you and then you’re hooked. And you want another. And it’s hard not to reach for a third (or fourth …), and you realize you’ll have to bake another batch.
I’m totally not kidding when I tell you that, together, my mom and my son easily demolished half a pan of Date Bars in just that one first day we tested them. (We’re not talking THK-healthy portion control here, for sure, but I 100% knew these were addictive enough, delicious enough, to share the recipe with all of you!)
Luckily, as cookies go, these Date Bars are actually really healthy, too! (So, you know … maybe go ahead and have another. But … ummmmm … maybe don’t eat half a pan in one day.)
How This Date Bar Recipe Is Healthier
As someone who cares so much about the nutrition in the food my family eats, I loved this recipe before I’d even baked the first batch.
For one thing, it had just a single tablespoon of butter. That’s it! I didn’t even have to pull out my usual health-ification tricks to slash some of the calories and naughty fats.
And, it featured protein-packed, heart-healthy walnuts, plus the headliner ingredient (a fruit!) … DATES!

The only thing I tweaked from the original recipe’s ingredients was using white whole wheat flour instead of “regular” all-purpose flour.
As I’ve mentioned many times before (like in my recipe for Healthy Whole Wheat Banana Bread), white whole wheat flour is more nutritious than all-purpose flour. In fact, it’s nutritionally equal to standard (browner) whole wheat flour. But white whole wheat flour looks and tastes more like the all-purpose flour my mom and grandma would’ve been baking with in their family farmhouse two generations ago.
So, I get the same flavor but with a big nutrition boost! A little modern twist to bring this old-fashioned recipe up to today’s nutritional standards. An easy swap you’ll never even notice or taste.
How to Make Your Own Old-Fashioned Treats
Making this Date Bar recipe is so quick and easy.
Step #1
Start by mixing the dry ingredients in one bowl, giving them a good whisk to make sure they’re well incorporated.

Step #2
In a second bowl, you combine the butter and sugar.
Note that you don’t want the butter to be melted, but you do want to start with softened butter.
You’re going to work the softened butter completely into the sugar – so it’s a bit like wet sand. But, since there’s so very little butter in the recipe, it’s not really like the creaming step you find in many other baking recipes, where you’d use an electric mixer. You can use an electric hand mixer if you want (I’ve tested that, and it works fine), but honestly, the quickest, easiest way to do this is simply to use your hands to work that tiny bit of butter into the sugar.
After you’ve got the butter and sugar thoroughly combined, you mix in the rest of the wet ingredients (plus the dates and walnuts).

Step #3
Sprinkle the dry ingredients over the wet ingredients, and stir just until they’re combined. The batter will be very thick.
Step #4
Use a rubber scraper to spread the batter into a 9×13 pan. You’ll need to push it to the edges and corners and smooth it a bit to make sure it’s spread evenly, in a thin layer.

Pop the pan in the oven and bake until it’s a lovely golden color.
The first time you make these Date Nut Bars (until you know exactly how the recipe bakes in your own oven), maybe set the timer a tad earlier than you’d expect, and peek at them often during the last few minutes of baking. You want to be sure you don’t over-bake these, or they’ll dry out (which can be a particular problem with healthier recipes like this one, since it has very little fat).
You’re shooting for them to have a moist and chewy texture inside, with a thin, crispy exterior.
Yummmm … yes … so much yummmmmm!

Now here’s the only hard part. Waiting. (Ohhhhhh but they smell sooooo good … sorry … just wait …)
Step #5
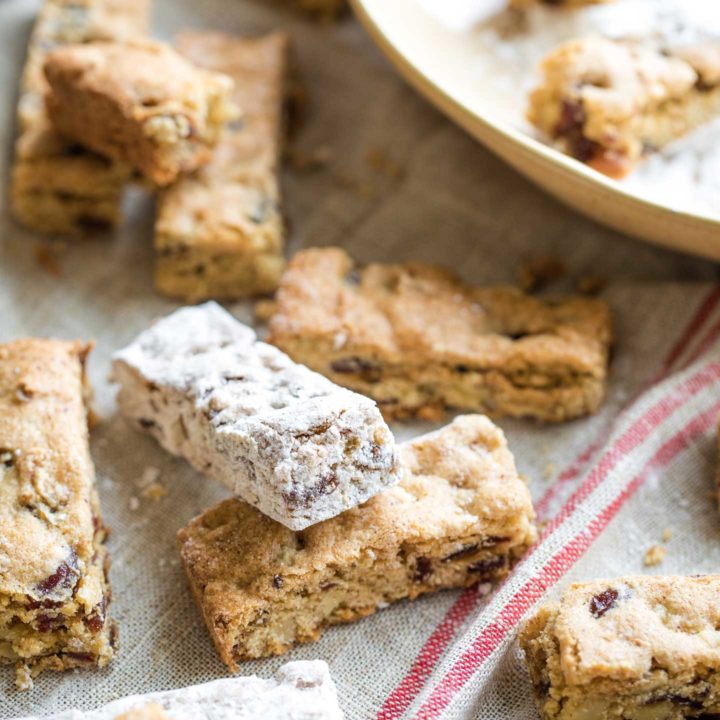
Once they’re completely cooled, cut them in straight, even lines. I like to cut mine 1″ wide x 3″ long, to yield 39 Date Bars.

They’re delicious just as they are at this point (so go ahead and nibble one while you work!), but the final, festive and scrumptious touch is definitely the powdered sugar.
Step #6
I was a little hesitant at first, worried about the healthfulness of this sugar step, and thinking that it would add way too much sugar.
But as I tested and re-tested the recipe, I was surprised to find that I actually used only about 1 tablespoon of sugar total (if I tapped each stick after I rolled it in the sugar, to shake loose any extra).

You’ll want to put more than 1 tablespoon of sugar in the bowl where you’ll roll your Date Bars, just to make the rolling easier. But ultimately, not all that much sugar coating ends up on the bars.
Freeze ‘Em Ahead for Christmas … or Any Time!
These Date Nut Bars freeze beautifully, so they’re a terrific make-ahead cookie for the holidays.
But, now that we’ve rediscovered this cherished recipe, we actually love making them all year ’round. I think I’ve baked them more often in the summer than at the holidays, actually!
No matter when I serve them, they’re a delicious little old-fashioned treat that my family just adores. Time and again, we’re all surprised at how fantastic a healthier cookie can be!
And we feel re-connected to a tiny piece of our family’s history, a moment in time when my mom was still a little girl, carefully helping with the annual Christmas baking.

This Date Bar recipe has a very special place in my heart, and I’m so happy to share it with all of you … with the hope that it finds a very special place in your home, and your heart, too!
Happy holidays!
Old-Fashioned Date Bar Recipe
An heirloom Date Bar recipe dating back nearly a century – and still just as delicious today!
• Freezable • Make Ahead • Vegetarian •
Ingredients
- 1 1/2 cups white whole wheat flour
- 2 teaspoons baking powder
- 1/2 teaspoon sea salt (fine grain, not flaked kosher salt)
- 1 cup sugar
- 1 tablespoon butter, softened (but NOT melted)
- 2 eggs, lightly beaten
- 2 tablespoons water
- 1 teaspoon vanilla
- 7 ounces whole, dried dates, chopped (to equal about 1 1/2 cups)
- 1/2 cup finely chopped walnuts
- to finish: about 1/4 cup powdered sugar (you will actually end up using only about 1 tablespoon)
Instructions
- Preheat oven to 350°F.
- Prepare a 9 x 13" baking pan by spraying with cooking spray and/or lightly but thoroughly flouring the bottom (if needed – my pan doesn't need this).
- In a medium bowl, whisk flour, baking powder, and salt until thoroughly combined.
- In a second medium bowl, combine sugar and butter until butter is completely incorporated into the sugar. The mixture will be crumbly, similar to wet sand. (I find it's easiest to do this with my hands, rubbing the butter into the sugar with my fingers, but you can also use an electric mixer.) Add eggs, water, and vanilla, and stir until thoroughly combined. Add the dates and walnuts and stir again to distribute evenly.
- Lightly dump the dry ingredients (flour mixture) over top of the wet ingredients (sugar mixture) and stir just until thoroughly combined. The dough will be very thick and sticky.
- Using a rubber scraper, spread the dough into the pan, pushing it and flattening it until it's an even thickness (dough will only thinly cover the entire pan).
- Bake for about 20-22 minutes, until lightly golden brown.
- Let cool completely in the pan on a cooling rack before cutting. Cut into 39 sticks that are 1 inch wide and 3 inches long.
- Place at least 1/4 cup of powdered sugar in a wide bowl. Roll each bar in the sugar to coat, tapping gently to remove any excess, loose sugar. (You should actually use only about 1 tablespoon of the sugar to thinly coat the bars, but it makes it much easier to work with them if there is plenty of extra sugar in the bowl. You can discard the excess.)
Notes
Freezing and make-ahead tips: These freeze really well, so they're a great make-ahead recipe for keeping some cookies in the freezer, ready in a pinch. You can cut the bars and roll each in powdered sugar prior to freezing (so you can pull them out individually as needed). Or, you can wrap and freeze the full pan, then defrost it, cut the bars, and roll them in sugar after freezing.
Nutrition Information:
Yield: 39 servings Serving Size: 1 barAmount Per Serving: Calories: 67Total Fat: 2gSaturated Fat: 0gTrans Fat: 0gUnsaturated Fat: 1gCholesterol: 10mgSodium: 58mgCarbohydrates: 13gFiber: 1gSugar: 9gProtein: 1g
Nutrition information should be considered an estimate only, and may vary depending on your choice of ingredients or preparation. No guarantees are made regarding allergies or dietary needs. Always consult a physician or dietician for specific advice and questions.


I just found your recipe. I also have the old Ohio recipe from my mom. Almost exactly like yours except she always added drained crushed pineapple . Was wondering if anyone else has added the pineapple? Our family love them and look forward to making them again this year. Want to try the white whole wheat flour. Loved your post. Merry Christmas
Oh, Rose Ann – I was so happy to read your note! I have thoroughly enjoyed so many similar messages from other readers – mostly living or having been raised in middle Ohio – who remember recipes very much like this one. It makes my heart so happy to think of the shared memories around this simple little cookie! But this pineapple idea – that’s new to me, and I think it’s REALLY intriguing! It sounds amazing! I’m so curious to try this twist myself, and I really appreciate that you mentioned it! I’ll be curious to see if other readers chime in here, saying that their families also used pineapple?!?! And definitely let me know what you think of the whole wheat flour idea – I really don’t anticipate that you’ll notice any difference in flavor or texture, but will just get a nice little nutritional upgrade! Merry Christmas to you and your family! ~Shelley
I was delighted to find your posting of this recipe and its background! I have the same recipe from my Ohio grandmother (she was born in 1890) and I grew up eating these often at her home. I was happy to find your directions because all I have is a list ingredients and simple baking directions (true to the way old recipes are written!). Your hints about not overbaking are very helpful because it is easy to do. I like to make the original recipe, as Grandma would have, but the variations look interesting
and I may have to venture out! Thank you for sharing your treasured recipe and techniques!
Awwwwwww Charlotte, I loved your message! One of the true joys for me in sharing this special heirloom recipe has been in hearing from others, like yourself, who also have fond memories or family connections tied to very similar recipes. It’s especially interesting to me how many people I’ve heard from who are from Ohio! I know exactly what you mean about old recipes often not having directions, and I’m so glad my directions and tips were helpful. Thanks bunches for reaching out – it means a lot! 😀 ~Shelley
Is it possible to substitute sunflower seeds or pumpkins seeds to make it nut free?
Hi, Tammie! I haven’t tested either of those specifically, but I don’t see any reason why they wouldn’t work just fine as a substitute. Sure, the flavor or texture might be slightly different, but I bet it’ll still be delicious. Let me know which you try and how you like it! ~Shelley
I love the consistency, but I feel it needs cinnamon or something. Gonna try adding some cinnamon to the powdered sugar.
I think cinnamon would be a delicious variation, Fran. Let me know how it goes! ~Shelley
I substituted: 3/4 c. Whole Wheat Pastry flour, 1/2 c. Oat flour, 1/4 c. Almond Flour, for “Flour”. 3/4 c. Date sugar and 1/4 c. Coconut sugar, for “Sugar”. They came out fantastic. Thanks!
I’m so delighted these came out fantastic for you, Kitty! They’re so special to my family, so close to our hearts … and I love it that I can share such a family favorite with others. Hope you have a wonderful holiday season! ~Shelley