Baked Spiral “Hawaiian Roll” Sliders
~ A fun riff on the always-popular baked party sandwiches, these cute Spiral Hawaiian Roll Sliders are easy to make, super adaptable, and so much healthier, too! We’ve got three different variations for you to try, so you can mix and match your favorites for party appetizers, tailgates, make-ahead dinners, or even grab-and-go snacks and lunches. ~
This Recipe Is: • Make Ahead •


* (Our little disclaimer …) We partnered with Flatout for this sponsored post, as part of their #FlatoutLove campaign, but all opinions are entirely our own. Thanks for supporting brands that support Two Healthy Kitchens and our mission of healthy eating! *
I feel like I’ve said this so many times before, but it’s absolutely true: Flatouts are problem solvers. Protein-packed, fiber-rich problem solvers.
When I needed healthier bread bowls and salad croutons? Flatouts had me covered. Fun lunchbox ideas that’d put excitement back in the school lunch doldrums? Flatouts had my back.
But really, these cute little Hawaiian Roll Sliders just might be my favorite solution yet!
Upping My “Party Sandwiches” Game
I’ve been making little baked party sandwiches for years and years now. You know the ones I’m talking about. They’re the mini sandwiches slathered in dripping butter and baked up all toasty and golden, often dotted with poppy seeds.
They’re warm and melty, sort of savory-sweet, and way more delicious than you’d think a miniature deli sandwich possibly could be.
Positively addictive.

Over the years, I’ve tweaked and improved, tasted and re-tweaked – trying to make those little sandwiches healthy enough that I could feel ok about serving them to people I cared about, while still keeping them so delicious that nobody noticed they were healthier (that’s really always my goal here at THK, you know! 😉 ).
Way back when I first embarked on this little sandwich journey, I started off working from a couple of Ham and Swiss Appetizer Sandwich recipes from my dear friend Lisa, and from Allrecipes.
But OH.My.Goodness! Both recipes called for an entire cup of butter. No. Just NO.
I knew I could do better than that!
So, over the years, I’ve slashed the butter … and also created my own flavor variations with different meats, lean cheeses and flavored mustards. (You’re actually getting three – that’s right THREE! – yummy variations today, all in one recipe! #BONUS).
Everyone still loves them (and debates which flavor combo is their fave), and nobody misses all that extra butter even one tiny bit.
Still delicious, still fun and party-worthy for special occasions.
BUT … I’ve always had a nagging feeling that I could improve them even a teeny bit more – that my work here wasn’t quite finished.
Mostly, I just didn’t love the bread options I had – a lot of not-very-nutritious white carbs.
Hmmmmmm … what to do, what to do …
Well Hello, Sweet Hawaiian Flatbreads!
Problem solved!
When I heard Flatout was launching several yummy new flatbread flavors this summer, you can bet my mind started running through all the glorious possibilities.
Mmmmmmmm … Olive Oil & Sea Salt, Southwest Chipotle, and Garden Ranch … all with pumped-up protein and fiber, and just 60 calories each! Yes, please!
But the new offerings also included (you guessed it!) Sweet Hawaiian Foldits. Those really caught my attention, because I knew just what I wanted to do with them!

Hawaiian Roll Sliders!!! Modernized, revamped and reincarnated into fun spirals with waaaaay more nutrition yet still all that party sandwich flavor goin’ on!
Yessssss!
Those new flatbreads were the solution I’d been waiting for, the final tweak that my baked sandwiches had needed!
And hey hey … these cute little mini sandwich roll-ups are really easy to make, too!
How to Make These Hawaiian Roll Sliders (A Visual Step-By-Step)
Let’s take a peek at how these come together:
1) Slice your Sweet Hawaiian Foldit flatbreads in half, lengthwise. I usually pile about 6 of them up at a time and carefully cut down through the entire stack.

2) Mix up the “Buttery Spreads”. (Oh yum!) I use a slightly different spread variation for each of the three sandwich types, but you can change it up and get creative … more on that later.

A couple of notes here, though: because we don’t want those yummy spreads to get too melty and become runny or greasy during baking, notice that you don’t want to melt the butter before mixing it with the other spread ingredients. Ideally, you just want it to be softened.
Also, I recommend finely grating your onion, rather than chopping or mincing it.

The onion ends up the perfect consistency, without noticeable bits like you’d have if you’d chopped it up instead. It adds stealthy flavor without screaming its presence.
3) Slather about 3 tablespoons of one flavor of “Buttery Spread” evenly across 8 of the halved flatbreads.
4) Then top with the cheeses. Divide each cheese evenly among the the flatbreads, so none of your spirals gets gipped and ends up skimpy on the fillings.

5) Next, top with the meats. Again, divide it all out evenly.

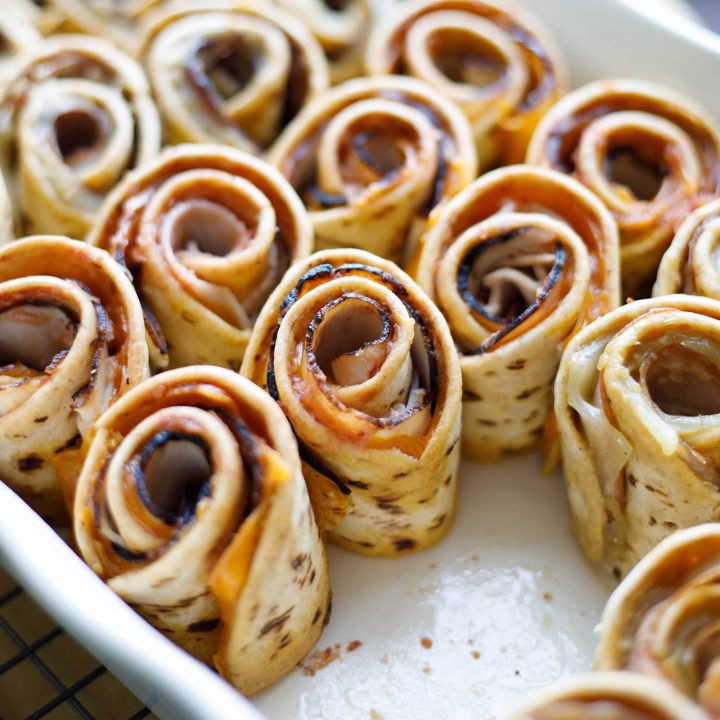
6) Roll ’em up! Just don’t roll so tightly that all the spreads and fillings squeeze out.

7) Nestle them together, cut-side down, in a baking dish. (An 11×7 pan is the ideal size. I adore my new Appolia baker that I used for these photos – so pretty! I got mine as a closeout, but it’s really similar to this one and measures almost exactly 11×7 in the bottom of the pan, even though it flares out to be more like 13×8 at the top.)
8) Repeat with the remaining 16 flatbread halves, and the remaining spreads, meats and cheeses. You’ll have 24 adorable little spiral sandwiches.
9) Brush the top of each type of spiral with the remaining tablespoon of its yummy, Buttery Spread.

10) Cover your pan with foil and bake at 350° for about 30 minutes. (You’re looking for the sandwiches to be warmed through and melty, but you don’t want these so hot that the butter spreads and cheeses have become runny or drippy.)
That’s it! Easy!
And you can even make them ahead (you know how happy that makes me – total sanity-saver!). Let’s talk about your options there …
Make-Ahead Tips
• Prep Ahead (Without Baking) – You can completely assemble these mini Hawaiian Roll Sliders up to about a day before you bake them. Just cover them with foil and refrigerate until you’re ready to bake. Definitely a busy host’s dream – you can pop these in the oven right before your party starts, then relax and enjoy your guests while delicious things magically appear, piping hot from your oven!
• Completely Bake Ahead – You can also go even further and bake these off, then cool them down and refrigerate them (already fully baked) for grab-and-go snacks or mini meals all week long. When I was testing and retesting this recipe, we had quite a few of these completely finished, little baked sandwiches lurking in our fridge for several days.
My kids were THRILLED!
All week long, we could grab one or two whenever we needed a quick bite as we dashed through the kitchen.

Once baked and cooled, they’re terrific gently rewarmed in the microwave, for maybe 10-15 seconds each (depending on how powerful your microwave is).
And, although they’re not quite as delicious without being rewarmed, they’re still pretty good grabbed straight from the fridge, so my kids happily stashed some in their school lunches, too. (Their lunch table buddies were a bit jealous!)
So that brings us to a key question, that really has no right answer:
Appetizer Party Sandwiches or Main Course?
No identity crisis here. These little sandwich spirals are happy to join in pretty much any meal, any occasion!
Appetizer Sandwiches – I know a lot of people think of baked sandwiches like these as party appetizers. And they definitely can be!

In fact, since the pretty spirals let you peak at all the warm, melty fillings waiting inside, this flatbread version of the classic baked sliders is even more enticing at parties and potlucks. They’re not too messy, either – so guests can walk and munch and chat and mingle, without worrying about dropping food all over their party duds.
Dinnertime Main Dish – But, sometimes we also make these as more of a main course. Grab two or three and serve ’em up with a salad or alongside soup or chili, and call it dinner.

Snacks and Lunch Boxes, Too! – Plus, like I mentioned above, once they’re baked, these are terrific to keep on hand for quick snacks or to throw in lunch boxes. (And if you love this type of lunch, be sure to peek at our other pinwheel sandwich recipe ideas, too.)
You pretty much can’t go wrong!
But you definitely can get creative and make these your own! Check it out …
Three Recipes in One! (And How to Customize Them)
So, today’s recipe is really like three recipes in one (yay – bonus!). You’ve got three different flavor combos, all together in one pan. It looks pretty, and it’s fun at parties for guests to try different flavors and compare which ones they like best.
You often see baked party sandwiches like these made specifically as ham and swiss sliders, but over the years, I’ve tried out other combinations, until I ended up with three different options that we can’t do without.
So, you should definitely feel free to riff on the theme here – after all, that’s what I did! You could:
• Mix and match different types of meats and cheeses. When possible, though, we always recommend that you slash some calories and saturated fat by choosing reduced-fat cheeses, and that you look for natural, minimally processed lunch meats.
• Change up the delicious “Buttery Spreads.” Can’t find cranberry mustard for the Turkey and Cheddar spirals? Don’t like horseradish mustard? No worries – switch it up! Or, keep things super-simple and just use smooth Dijon mustard for all three. Trust me – still delicious!

• Double or triple the amounts for your favorite kinds. Love the Roast Beef and Provolone? Go ahead and make an entire pan filled with just those! Don’t like the Turkey and Cheddar as much as the Ham and Swiss? Then double up on a fave and ditch the other.
It’s really easy to adjust the quantities!
In fact, when I make baked sandwiches for big parties, I typically make an entire, separate pan of each kind (yep – three pans!). And people really do stand around tasting and munching and debating their favorites (great little party ice breaker, actually!).
Can’t Find Sweet Hawaiian Flatbreads? (More Customizing Options)
If those new Sweet Hawaiian Flatout flatbreads haven’t made it to your store yet … or, more likely, your store has simply run out …
First, don’t panic!
I saw this coming, and I’ve gotcha covered. With how popular Flatouts have become lately, sometimes I find that my store’s run out of a certain type, right when I need it.
But I repeat … don’t panic!
We also tested this recipe for you with other Flatout Foldit flavors, and every one of them was great. I especially recommend the whole-grain-filled 5 Grain Flax variety.
In a pinch, you can definitely play around with other flatbread varieties – just one more way to customize your little sammies and really make them your own!
Baked Sandwiches Without Poppy Seeds? (*gasp*)
So … those poppy seeds. Seems like most of the Hawaiian Roll Slider recipes you see out there have poppy seeds – either mixed in with the butter spread, or sprinkled on top of the sandwiches (or both).
I’ve tried it, and I just don’t get it.
As far as I can tell, the only possible thing poppy seeds contribute here is that they generate more party convos as everyone uncomfortably asks each other whether they’ve got black dots wedged between their teeth.
Really, I recommend skipping the poppy seeds.
But hey, you do you. I’ve mentioned about 3,000 times now that this recipe is super customizable. If you’re a poppy seed fan … then go for it!
A Definite Must-Try Recipe!
Make ’em ahead, and customize them any way you want … for parties, for dinner, for just-because-they’re-quick-and-awesome! These cute mini sandwiches seriously have it allllll going on!

And finally, finally, I feel like I’ve completed my quest to make baked sandwiches that are truly the very best, yummiest, and healthiest they possibly can be.
Problem solved. Mission accomplished.
And now you can up your own baked sandwich game, too! (Everybody’s got a baked sandwich game, right?) Make these … and you’ll never look back!
Baked Spiral "Hawaiian Roll" Sliders
An updated take on those always-popular baked party sandwiches! These Spiral Hawaiian Roll Sliders are easy to make, super adaptable (we've got 3 different variations), and so much healthier, too! Make them ahead for stress-free party appetizers, easy dinners, or even grab-and-go snacks and lunches!
• Make Ahead •
Ingredients
- 2 packages (6 flatbreads each) Flatout Foldit Sweet Hawaiian Flatbreads (see note)
For 8 Ham and Swiss Spiral Sandwiches:
- 1 1/2 tablespoons butter, softened (but not melted)
- 1 tablespoon brown sugar
- 1 tablespoon Dijon mustard (we use smooth)
- 1 tablespoon grated sweet onion (see note)
- 1 teaspoon organic or olive oil reduced-fat mayo
- 1/4 teaspoon Worcestershire sauce
- 1/3 pound (approx. 5.5 ounces) thinly sliced deli ham (we like brown sugar ham)
- 1/4 pound (4 ounces) thinly sliced, reduced-fat Swiss cheese
For 8 Turkey and Cheddar Spiral Sandwiches:
- 1 1/2 tablespoons butter, softened (but not melted)
- 1 tablespoon cranberry honey mustard (or Dijon mustard)
- 1 tablespoon grated sweet onion (see note)
- 1 teaspoon organic or olive oil reduced-fat mayo
- 1/4 teaspoon Worcestershire sauce
- 1/3 pound (approx. 5.5 ounces) thinly sliced deli turkey (we like honey-maple turkey)
- 1/4 pound (4 ounces) thinly sliced, reduced-fat cheddar cheese
For 8 Roast Beef and Provolone Spiral Sandwiches:
- 1 1/2 tablespoons butter, softened (but not melted)
- 1 tablespoon horseradish mustard
- 1 tablespoon grated sweet onion (see note)
- 1 teaspoon organic or olive oil reduced-fat mayo
- 1/4 teaspoon Worcestershire sauce
- 1/3 pound (approx. 5.5 ounces) thinly sliced lean deli roast beef
- 1/4 pound (4 ounces) thinly sliced, reduced-fat provolone cheese
Instructions
1) Preheat oven to 350°F.
2) Cut all 12 of the Flatout Foldits in half longways (refer to photos in post if needed), to yield 24 halves. Set aside.
3) In three small, separate bowls, combine the "Buttery Spread" ingredients (butter through Worcestershire sauce) for each type of sandwich. Whisk or stir to combine thoroughly (but note in the post's photos that the Buttery Spreads will still look a little lumpy from the onions and from bits of butter). Set aside.
4) To assemble sandwiches, lay halved flatbreads out on a work surface, working in batches to assemble each sandwich type. (Refer to step-by-step photos in the post if needed.) For each of the three sandwich types:
- Evenly slather 8 flatbread halves with 3 tablespoons of the Buttery Spread (reserving about 1 tablespoon).
- Top with cheese, dividing the cheese evenly among all 8 flatbread halves.
- Next, top with meat, dividing evenly.
- Roll each of the 8 sandwiches into a spiral and place it, cut side down, into an ungreased 11x7-inch baking dish, tucking in edges so spirals stay closed during baking.
- Using a pastry brush or rubber spreader, dab the reserved 1 tablespoon of the Buttery Spread evenly across the top edges of the 8 sandwiches.
5) Repeat this process with the next two types of sandwiches, beginning with slathering the Buttery Spread on the flatbreads, then adding cheese, then adding meat, then rolling up and dabbing the tops with a little more of the Buttery Spread.
6) Once all 24 rolled sandwiches are placed in the pan, cover pan with foil and bake for about 30 minutes, until the sandwiches are warmed through and the cheese is slightly melty but not runny. (Alternately, you can delay baking by several hours or up to 1 day, refrigerating the pan of finished sandwiches, covered, until you're ready to bake them. See note below about make-ahead options.)
Notes
Flatbreads: If your store doesn't carry the Sweet Hawaiian variety of Foldit flatbreads, feel free to experiment with mixing and matching other Foldit varieties. We've also tested this recipe with the 5 Grain Flax and the Ancient Grains varieties. Both are delicious with this recipe, and both are loaded with protein, fiber and whole grains. Note, however, that some varieties have 5 flatbreads per package, while others have 6. You will need a total of 12 flatbreads to yield the 24 sandwiches in this recipe.
Grating onion: As shown in the photo in the post above, we recommend grating the onion on the medium-sized grater side of a box grater.
Choosing meats: We recommend selecting natural and minimally processed lunch meats, and also choosing leaner varieties whenever possible.
Swapping meats, cheeses and spreads: As mentioned in the post, feel free to experiment with different combinations of flavors, or even to fill an entire pan with all one type of sandwich if you have a favorite.
Make-ahead options: You can completely prepare these spiral slider sandwiches prior to baking, up to a day in advance, which is great for parties and entertaining. Simply cover the baking pan and refrigerate until baking.
In addition, after baking, these are great for quick, grab-and-go snacks and mini meals throughout the week. You can bake the entire pan, then cool and refrigerate until needed. After being baked, the sandwiches can be eaten cold, but are even more delicious rewarmed gently in the microwave, for about 10-15 seconds each.
Nutrition Information:
Yield: 24 servings Serving Size: 1 sandwich spiralAmount Per Serving: Calories: 215
Nutrition information should be considered an estimate only, and may vary depending on your choice of ingredients or preparation. No guarantees are made regarding allergies or dietary needs. Always consult a physician or dietician for specific advice and questions.


")

These are fun!
So glad you like them! They really are fun … both to make, and to eat! 😀 ~Shelley
I won’t put an entire cup of butter in a recipe unless it is for frosting for a cupcake 😉 These spirals are so cute, and look super tasty 🙂
Hahaha, Cathleen! I hear ya on that cup of butter! How can I feel good about serving that to people I love?!?! That’s exactly the sort of problem that inspired me to start this blog – to find healthier alternatives (that are still delicious!). I’m so happy with how this recipe turned out – it ticks allllll the boxes of being so much healthier but still crazy-yummy (and easy enough for busy people to accomplish, too)! Thanks so much for popping by – can’t wait for you to try these! ~Shelley
WOW!! Look. at. those! Great idea, amazing pics.. mouthwatering recipe. I love everything about this. Super veratile and great to know these can be made ahead of time.
Oh you’re so sweet, Heather! Thank you! And yes, besides the fact that these little sammies are just so darn good, it’s really awesome that they can be made ahead! Total bonus for busy hostesses, but also great for make-ahead weeknight dinners and even a grab-and-go option for snacks and lunch boxes. Seriously – these are just so adaptable … and really, really yummy! Enjoy! ~Shelley
What a fun twist on sliders! I’ll definitely be filling this away for our next get-together!
Oh yes – they are a perfect make-ahead party recipe (so nice, as the hostess, to have these ready to go at party time – no stress!). I know most people think of little baked sandwiches like these as party appetizers, but I actually generally use them as more of a main dish for a casual dinner buffet. For my twins’ winter b-day party each year – a big family party with lots of grandparents and aunts and uncles – I like to make three pans of baked sandwiches (one pan filled with each flavor), and usually also a steaming pot of slow cooker chili, plus some salads and sides. It’s perfect, and everyone loves it! ~Shelley
These sound incredible, my family would really enjoy them. I can’t wait to give them a try!
Thanks so much, Stacey! We all really, really like these – and everybody in my family has their own particular favorite. For example, my daughter likes the roast beef sliders best, and my son likes the ham and swiss sliders best … and I usually prefer whichever one I happen to be eating at the moment LOL! So excited for you and your family to try them, too – please pop back and let me know what you think! ~Shelley